Hello 驱动开发入门 (无硬件操作)
本章节将带领大家编写第一个 Linux 驱动程序——Hello 驱动。该驱动不涉及具体的硬件操作,旨在帮助大家理解 Linux 驱动开发的基本流程、核心结构体 file_operations 以及应用程序与驱动程序之间的数据交互机制。
示例源码下载:Hello 驱动源码
1. 核心概念:文件与驱动的关联
在 Linux 中,"一切皆文件"。理解应用程序如何通过文件系统访问到底层驱动,是驱动开发的第一步。
1.1 APP 打开的文件在内核中的表示
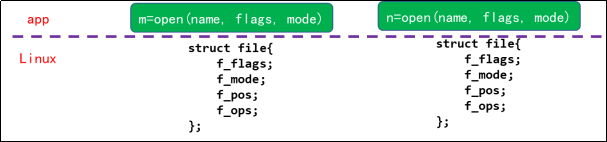
当应用程序(APP)调用 open 函数打开一个文件时,操作系统会返回一个整数,称为文件句柄(File Descriptor)。在内核层面,每一个文件句柄都对应一个 struct file 结构体。
在使用 open 函数时,传入的参数(如 flags、mode)会被记录在内核 struct file 结构体的 f_flags 和 f_mode 成员中:
int open(const char *pathname, int flags, mode_t mode);
当进行读写操作时,文件的当前读写位置(偏移量)会保存在 struct file 的 f_pos 成员中。
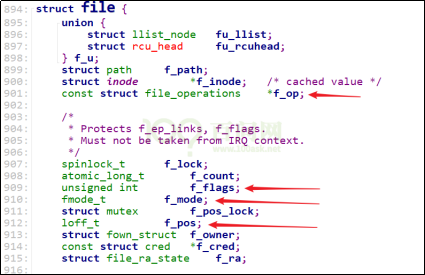
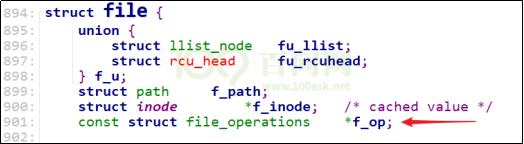
1.2 字符设备驱动的核心:struct file_operations
当打开一个字符设备节点(如 /dev/hello)时,内核中生成的 struct file 结构体包含一个指向 struct file_operations 的指针 f_op。这个 f_op 正是由我们驱动程序提供的。
驱动程序的 struct file:
驱动程序的 open/read/write:
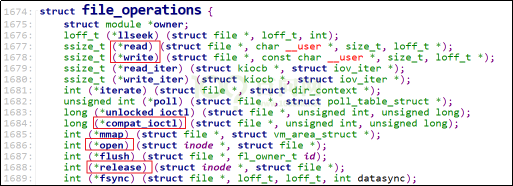
struct file_operations 结构体定义了驱动程序对外提供的操作接口:
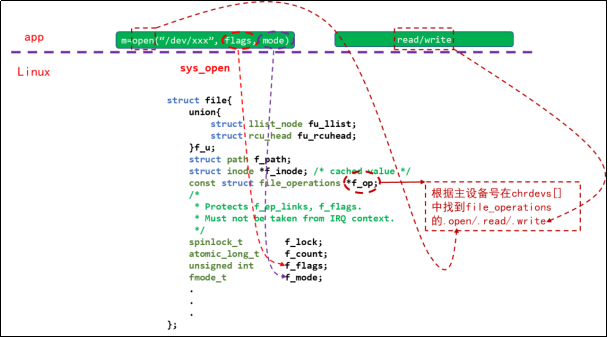
1.3 应用程序与驱动程序的调用流程
APP 与驱动程序之间的对应关系简单概括如下:
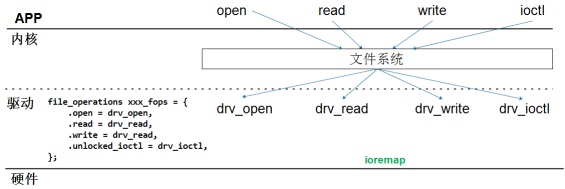
当 APP 调用 open 函数时,内核根据设备节点的主设备号找到驱动程序注册的 struct file_operations 结构体,并调用其中的 open 函数。
后续 APP 调用 read/write/ioctl 等函数时,内核会通过 struct file 找到同一个 file_operations 结构体,并执行对应的 read/write/unlocked_ioctl 函数。
2. 编写驱动程序的步骤
编写一个字符设备驱动程序通常包含以下 7 个步骤:
- 确定主设备号:可以手动指定,也可以让内核动态分配。
- 定义 file_operations 结构体:这是驱动的核心。
- 实现操作函数:编写
drv_open、drv_read、drv_write等函数,并填入file_operations结构体中。 - 注册驱动:在入口函数中调用
register_chrdev告诉内核。 - 编写入口函数:使用
module_init修饰,在加载模块时调用。 - 编写出口函数:使用
module_exit修饰,在卸载模块时调用unregister_chrdev。 - 自动创建设备节点:使用
class_create和device_create,以便系统自动在/dev下生成设备文件。
3. 代码实战
3.1 编写驱动程序 (hello_drv.c)
我们的目标是实现一个简单的驱动:
- 实现
open,read,write,release函数。 - APP 写数据时,驱动将其保存在内核缓冲区。
- APP 读数据时,驱动将缓冲区的数据返回给 APP。
点击查看 hello_drv.c 完整源码
#include <linux/module.h>
#include <linux/fs.h>
#include <linux/errno.h>
#include <linux/miscdevice.h>
#include <linux/kernel.h>
#include <linux/major.h>
#include <linux/mutex.h>
#include <linux/proc_fs.h>
#include <linux/seq_file.h>
#include <linux/stat.h>
#include <linux/init.h>
#include <linux/device.h>
#include <linux/tty.h>
#include <linux/kmod.h>
#include <linux/gfp.h>

/* 1. 确定主设备号 */
static int major = 0;
static char kernel_buf[1024];
static struct class *hello_class;

#define MIN(a, b) (a < b ? a : b)

/* 3. 实现对应的open/read/write等函数,填入file_operations结构体 */
static ssize_t hello_drv_read (struct file *file, char __user *buf, size_t size, loff_t *offset)
{
     int err;
     printk("%s %s line %d\n", __FILE__, __FUNCTION__, __LINE__);
     err = copy_to_user(buf, kernel_buf, MIN(1024, size));
     return MIN(1024, size);
}

static ssize_t hello_drv_write (struct file *file, const char __user *buf, size_t size, loff_t *offset)
{
     int err;
     printk("%s %s line %d\n", __FILE__, __FUNCTION__, __LINE__);
     err = copy_from_user(kernel_buf, buf, MIN(1024, size));
     return MIN(1024, size);
}

static int hello_drv_open (struct inode *node, struct file *file)
{
     printk("%s %s line %d\n", __FILE__, __FUNCTION__, __LINE__);
     return 0;
}

static int hello_drv_close (struct inode *node, struct file *file)
{
     printk("%s %s line %d\n", __FILE__, __FUNCTION__, __LINE__);
     return 0;
}

/* 2. 定义自己的file_operations结构体 */
static struct file_operations hello_drv = {
     .owner   = THIS_MODULE,
     .open    = hello_drv_open,
     .read    = hello_drv_read,
     .write   = hello_drv_write,
     .release = hello_drv_close,
};

/* 4. 把file_operations结构体告诉内核:注册驱动程序 */
/* 5. 谁来注册驱动程序啊?得有一个入口函数:安装驱动程序时,就会去调用这个入口函数 */
static int __init hello_init(void)
{
     int err;

     printk("%s %s line %d\n", __FILE__, __FUNCTION__, __LINE__);
     major = register_chrdev(0, "hello", &hello_drv);  /* /dev/hello */

     hello_class = class_create(THIS_MODULE, "hello_class");
     err = PTR_ERR(hello_class);
     if (IS_ERR(hello_class)) {
             printk("%s %s line %d\n", __FILE__, __FUNCTION__, __LINE__);
             unregister_chrdev(major, "hello");
             return -1;
     }

     device_create(hello_class, NULL, MKDEV(major, 0), NULL, "hello"); /* /dev/hello */

     return 0;
}

/* 6. 有入口函数就有出口函数:卸载驱动程序时就会去调用这个出口函数 */
static void __exit hello_exit(void)
{
     printk("%s %s line %d\n", __FILE__, __FUNCTION__, __LINE__);
     device_destroy(hello_class, MKDEV(major, 0));
     class_destroy(hello_class);
     unregister_chrdev(major, "hello");
}

/* 7. 其他完善:提供设备信息,自动创建设备节点 */
module_init(hello_init);
module_exit(hello_exit);

MODULE_LICENSE("GPL");
代码解析:
- 入口函数 (
hello_init):调用register_chrdev注册驱动,并利用class_create和device_create创建设备类和设备节点。 file_operations(hello_drv):关联了open,read,write,release函数。- 数据传输:驱动与应用程序之间的数据传输必须使用
copy_from_user(用户->内核) 和copy_to_user(内核->用户)。
3.2 编写测试程序 (hello_drv_test.c)
测试程序用于验证驱动功能,支持写和读操作:
./hello_drv_test  -w  www.100ask.net  # 把字符串发给驱动程序
./hello_drv_test  -r                  # 把驱动中保存的字符串读回来
点击查看 hello_drv_test.c 完整源码
#include <sys/types.h>
#include <sys/stat.h>
#include <fcntl.h>
#include <unistd.h>
#include <stdio.h>
#include <string.h>

/*
 * ./hello_drv_test -w abc
 * ./hello_drv_test -r
 */
int main(int argc, char **argv)
{
     int fd;
     char buf[1024];
     int len;

     /* 1. 判断参数 */
     if (argc < 2)
     {
             printf("Usage: %s -w <string>\n", argv[0]);
             printf("       %s -r\n", argv[0]);
             return -1;
     }

     /* 2. 打开文件 */
     fd = open("/dev/hello", O_RDWR);
     if (fd == -1)
     {
             printf("can not open file /dev/hello\n");
             return -1;
     }

     /* 3. 写文件或读文件 */
     if ((0 == strcmp(argv[1], "-w")) && (argc == 3))
     {
             len = strlen(argv[2]) + 1;
             len = len < 1024 ? len : 1024;
             write(fd, argv[2], len);
     }
     else
     {
             len = read(fd, buf, 1024);
             buf[1023] = '\0';
             printf("APP read : %s\n", buf);
     }

     close(fd);

     return 0;
}
3.3 编译与测试
3.3.1 安装内核头文件
在编译驱动模块之前,必须确保系统安装了与当前运行内核版本匹配的头文件。
下载地址:linux-headers-vendor-rk35xx...deb
安装命令:
sudo dpkg -i linux-headers-vendor-rk35xx_*.deb
安装完成后,系统会在 /lib/modules/$(uname -r)/build 建立一个指向内核头文件的符号链接。
3.3.2 编写 Makefile
创建 Makefile 文件,内容如下:
# Makefile for hello_drv kernel module

# 模块名,不需要写 .c 后缀
obj-m := hello_drv.o

# 内核构建目录(自动指向当前运行内核的 headers)
KDIR := /lib/modules/$(shell uname -r)/build

# 当前路径
PWD := $(shell pwd)

# 默认目标:编译驱动模块 + 应用
all: module app

# 编译内核模块
module:
	$(MAKE) -C $(KDIR) M=$(PWD) modules

# 编译应用程序
app:
	$(CC) hello_drv_test.c -o hello_drv_test

# 清理目标文件
clean:
	$(MAKE) -C $(KDIR) M=$(PWD) clean
	rm -f hello_drv_test
3.3.3 上机实验
在开发板上执行以下步骤:
- 编译:
make - 加载驱动:
检查设备节点:
sudo insmod hello_drv.kols /dev/hello - 运行测试:
- 写入数据:
sudo ./hello_drv_test -w dshanpi-a1 - 读取数据:
预期输出:
sudo ./hello_drv_test -rAPP read : dshanpi-a1
- 写入数据:
4. 深入理解 (选读)
4.1 module_init/module_exit 的奥秘
驱动程序既可以编译进内核(Built-in),也可以编译成模块(.ko)。module_init 和 module_exit 宏会根据 MODULE 宏的定义有不同的实现。
- 编译进内核时:它们会被展开为
__initcall和__exitcall,将函数指针存放在特定的段(section)中。内核启动时会遍历.initcall段来执行初始化函数。 - 编译成模块时:它们定义了
init_module和cleanup_module函数别名。insmod命令加载模块时调用init_module,rmmod卸载时调用cleanup_module。
4.2 register_chrdev 的内部实现
register_chrdev 用于注册字符设备,其核心工作是维护内核中的 chrdevs 数组。
static struct char_device_struct {
    struct char_device_struct *next;
    unsigned int major;
    unsigned int baseminor;
    int minorct;
    char name[64];
    struct cdev *cdev;      /* will die */
} *chrdevs[CHRDEV_MAJOR_HASH_SIZE];
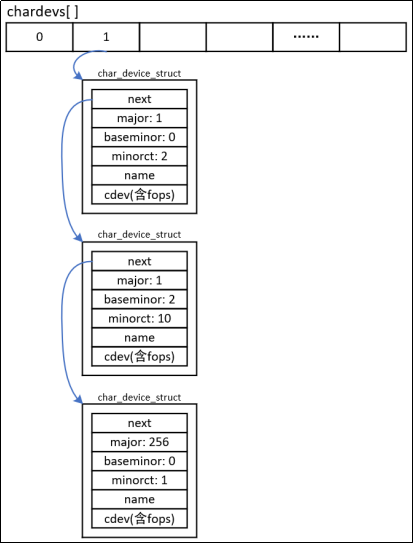
- 内核通过主设备号(Major)和次设备号(Minor)来索引和定位驱动程序。
chrdevs数组是一个哈希表,每个表项是一个链表头,链表中存储了char_device_struct。- 最终,内核通过
cdev结构体找到我们注册的file_operations,从而完成从设备文件到驱动函数的映射。