人形检测模型部署
参考资料:
1.获取原始模型
1.进入人形检测目录:
cd ~/Projects/rknn_model_zoo/examples/yolov8_pose/model
2.获取预训练模型
chmod +x download_model.sh
./download_model.sh
运行效果如下:
(base) baiwen@dshanpi-a1:~/Projects/rknn_model_zoo/examples/yolov8_pose/model$ ./download_model.sh
--2025-08-19 14:28:38--  https://ftrg.zbox.filez.com/v2/delivery/data/95f00b0fc900458ba134f8b180b3f7a1/examples/yolov8_pose/yolov8n-pose.onnx
Resolving ftrg.zbox.filez.com (ftrg.zbox.filez.com)... 180.184.171.46
Connecting to ftrg.zbox.filez.com (ftrg.zbox.filez.com)|180.184.171.46|:443... connected.
HTTP request sent, awaiting response... 200
Length: 13326816 (13M) [application/octet-stream]
Saving to: ‘./yolov8n-pose.onnx’

./yolov8n-pose.onnx           100%[==============================================>]  12.71M   588KB/s    in 18s

2025-08-19 14:28:56 (731 KB/s) - ‘./yolov8n-pose.onnx’ saved [13326816/13326816]
2.模型转换
1.使用Conda激活rknn-toolkit2环境
conda activate rknn-toolkit2
2.进入yolov8_pose模型转换目录
cd ~/Projects/rknn_model_zoo/examples/yolov8_pose/python
3.执行模型转换
python3 convert.py ../model/yolov8n-pose.onnx rk3576
运行效果如下:
(rknn-toolkit2) baiwen@dshanpi-a1:~/Projects/rknn_model_zoo/examples/yolov8_pose/python$ python3 convert.py ../model/yolov8n-pose.onnx rk3576
I rknn-toolkit2 version: 2.3.2
--> Config model
done
--> Loading model
I Loading : 100%|█████████��██████████████████████████████████████| 167/167 [00:00<00:00, 8309.20it/s]
done
--> Building model
I OpFusing 0: 100%|██████████████████████████████████████████████| 100/100 [00:00<00:00, 108.73it/s]
I OpFusing 1 : 100%|██████████████████████████████████████████████| 100/100 [00:01<00:00, 52.42it/s]
I OpFusing 0 : 100%|██████████████████████████████████████████████| 100/100 [00:03<00:00, 26.72it/s]
I OpFusing 1 : 100%|██████████████████████████████████████████████| 100/100 [00:04<00:00, 23.30it/s]
I OpFusing 0 : 100%|██████████████████████████████████████████████| 100/100 [00:04<00:00, 21.51it/s]
I OpFusing 1 : 100%|██████████████████████████████████████████████| 100/100 [00:04<00:00, 20.61it/s]
I OpFusing 2 : 100%|██████████████████████████████████████████████| 100/100 [00:07<00:00, 14.11it/s]
I GraphPreparing : 100%|█████████████████████████████████████████| 202/202 [00:00<00:00, 820.24it/s]
I Quantizating : 100%|████████████████████████████████████████████| 202/202 [01:20<00:00, 2.52it/s]
W hybrid_quantization_step2: The node that pointed by '/model.22/Slice_3_output_0' is specaifed repeatedly!
I OpFusing 0: 100%|█████████████████████████████████████████████| 100/100 [00:00<00:00, 5195.79it/s]
I OpFusing 1 : 100%|████████████████████████████████████████████| 100/100 [00:00<00:00, 3367.67it/s]
I OpFusing 2 : 100%|████████████████████████████████████████████| 100/100 [00:00<00:00, 2700.01it/s]
W hybrid_quantization_step2: The default input dtype of 'images' is changed from 'float32' to 'int8' in rknn model for performance!
Please take care of this change when deploy rknn model with Runtime API!
W hybrid_quantization_step2: The default output dtype of 'output0' is changed from 'float32' to 'int8' in rknn model for performance!
Please take care of this change when deploy rknn model with Runtime API!
I rknn building ...
I rknn building done.
done
--> Export rknn model
output_path: ../model/yolov8_pose.rknn
done
可以看到转换完成后在model目录下看到端侧的RKNN模型。
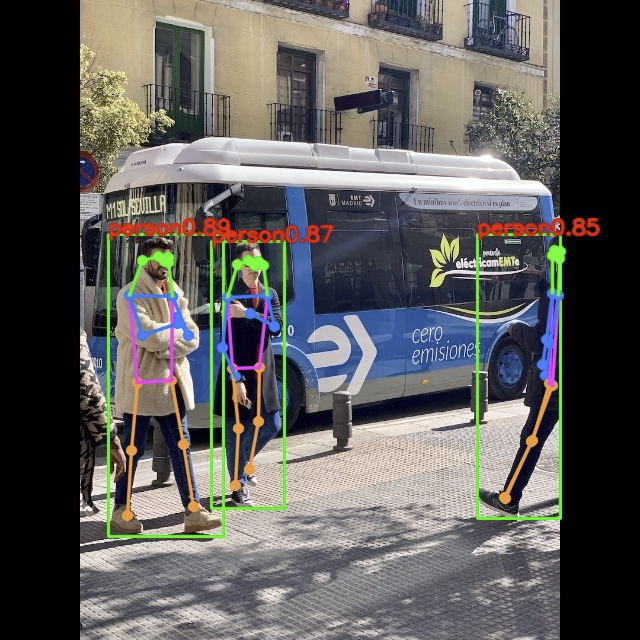
3.模型推理
执行推理测试代码:
python3 yolov8_pose.py --model_path ../model/yolov8_pose.rknn --target rk3576
运行效果如下:
(rknn-toolkit2) baiwen@dshanpi-a1:~/Projects/rknn_model_zoo/examples/yolov8_pose/python$ python3 yolov8_pose.py --model_path ../model/yolov8_pose.rknn --target rk3576
I rknn-toolkit2 version: 2.3.2
done
--> Init runtime environment
I target set by user is: rk3576
done
--> Running model
W inference: The 'data_format' is not set, and its default value is 'nhwc'!
save image in ./result.jpg
运行完成后可以在当前目录下生成result.jpg结果图像。
4.视频流推理�
开始前请注意,请务必接入USB摄像头,并确认/dev/目录下存在video0设备节点!!!
1.新建程序文件yolov8_pose_video.py,填入一下内容:
import os
import sys
import urllib
import urllib.request
import time
import numpy as np
import argparse
import cv2,math
from math import ceil

from rknn.api import RKNN

CLASSES = ['person']

nmsThresh = 0.4
objectThresh = 0.5

def letterbox_resize(image, size, bg_color):
    """
    letterbox_resize the image according to the specified size
    :param image: input image, which can be a NumPy array or file path
    :param size: target size (width, height)
    :param bg_color: background filling data
    :return: processed image
    """
    if isinstance(image, str):
        image = cv2.imread(image)

    target_width, target_height = size
    image_height, image_width, _ = image.shape

    # Calculate the adjusted image size
    aspect_ratio = min(target_width / image_width, target_height / image_height)
    new_width = int(image_width * aspect_ratio)
    new_height = int(image_height * aspect_ratio)

    # Use cv2.resize() for proportional scaling
    image = cv2.resize(image, (new_width, new_height), interpolation=cv2.INTER_AREA)

    # Create a new canvas and fill it
    result_image = np.ones((target_height, target_width, 3), dtype=np.uint8) * bg_color
    offset_x = (target_width - new_width) // 2
    offset_y = (target_height - new_height) // 2
    result_image[offset_y:offset_y + new_height, offset_x:offset_x + new_width] = image
    return result_image, aspect_ratio, offset_x, offset_y


class DetectBox:
    def __init__(self, classId, score, xmin, ymin, xmax, ymax, keypoint):
        self.classId = classId
        self.score = score
        self.xmin = xmin
        self.ymin = ymin
        self.xmax = xmax
        self.ymax = ymax
        self.keypoint = keypoint

def IOU(xmin1, ymin1, xmax1, ymax1, xmin2, ymin2, xmax2, ymax2):
    xmin = max(xmin1, xmin2)
    ymin = max(ymin1, ymin2)
    xmax = min(xmax1, xmax2)
    ymax = min(ymax1, ymax2)

    innerWidth = xmax - xmin
    innerHeight = ymax - ymin

    innerWidth = innerWidth if innerWidth > 0 else 0
    innerHeight = innerHeight if innerHeight > 0 else 0

    innerArea = innerWidth * innerHeight

    area1 = (xmax1 - xmin1) * (ymax1 - ymin1)
    area2 = (xmax2 - xmin2) * (ymax2 - ymin2)

    total = area1 + area2 - innerArea

    return innerArea / total


def NMS(detectResult):
    predBoxs = []

    sort_detectboxs = sorted(detectResult, key=lambda x: x.score, reverse=True)

    for i in range(len(sort_detectboxs)):
        xmin1 = sort_detectboxs[i].xmin
        ymin1 = sort_detectboxs[i].ymin
        xmax1 = sort_detectboxs[i].xmax
        ymax1 = sort_detectboxs[i].ymax
        classId = sort_detectboxs[i].classId

        if sort_detectboxs[i].classId != -1:
            predBoxs.append(sort_detectboxs[i])
            for j in range(i + 1, len(sort_detectboxs), 1):
                if classId == sort_detectboxs[j].classId:
                    xmin2 = sort_detectboxs[j].xmin
                    ymin2 = sort_detectboxs[j].ymin
                    xmax2 = sort_detectboxs[j].xmax
                    ymax2 = sort_detectboxs[j].ymax
                    iou = IOU(xmin1, ymin1, xmax1, ymax1, xmin2, ymin2, xmax2, ymax2)
                    if iou > nmsThresh:
                        sort_detectboxs[j].classId = -1
    return predBoxs


def sigmoid(x):
    return 1 / (1 + np.exp(-x))

def softmax(x, axis=-1):
    # 将输入向量减去最大值以提高数值稳定性
    exp_x = np.exp(x - np.max(x, axis=axis, keepdims=True))
    return exp_x / np.sum(exp_x, axis=axis, keepdims=True)

def process(out,keypoints,index,model_w,model_h,stride,scale_w=1,scale_h=1):
    xywh=out[:,:64,:]
    conf=sigmoid(out[:,64:,:])
    out=[]
    for h in range(model_h):
        for w in range(model_w):
            for c in range(len(CLASSES)):
                if conf[0,c,(h*model_w)+w]>objectThresh:
                    xywh_=xywh[0,:,(h*model_w)+w] #[1,64,1]
                    xywh_=xywh_.reshape(1,4,16,1)
                    data=np.array([i for i in range(16)]).reshape(1,1,16,1)
                    xywh_=softmax(xywh_,2)
                    xywh_ = np.multiply(data, xywh_)
                    xywh_ = np.sum(xywh_, axis=2, keepdims=True).reshape(-1)

                    xywh_temp=xywh_.copy()
                    xywh_temp[0]=(w+0.5)-xywh_[0]
                    xywh_temp[1]=(h+0.5)-xywh_[1]
                    xywh_temp[2]=(w+0.5)+xywh_[2]
                    xywh_temp[3]=(h+0.5)+xywh_[3]

                    xywh_[0]=((xywh_temp[0]+xywh_temp[2])/2)
                    xywh_[1]=((xywh_temp[1]+xywh_temp[3])/2)
                    xywh_[2]=(xywh_temp[2]-xywh_temp[0])
                    xywh_[3]=(xywh_temp[3]-xywh_temp[1])
                    xywh_=xywh_*stride

                    xmin=(xywh_[0] - xywh_[2] / 2) * scale_w
                    ymin = (xywh_[1] - xywh_[3] / 2) * scale_h
                    xmax = (xywh_[0] + xywh_[2] / 2) * scale_w
                    ymax = (xywh_[1] + xywh_[3] / 2) * scale_h
                    keypoint=keypoints[...,(h*model_w)+w+index]
                    keypoint[...,0:2]=keypoint[...,0:2]//1
                    box = DetectBox(c,conf[0,c,(h*model_w)+w], xmin, ymin, xmax, ymax,keypoint)
                    out.append(box)

    return out

pose_palette = np.array([[255, 128, 0], [255, 153, 51], [255, 178, 102], [230, 230, 0], [255, 153, 255],
                         [153, 204, 255], [255, 102, 255], [255, 51, 255], [102, 178, 255], [51, 153, 255],
                         [255, 153, 153], [255, 102, 102], [255, 51, 51], [153, 255, 153], [102, 255, 102],
                         [51, 255, 51], [0, 255, 0], [0, 0, 255], [255, 0, 0], [255, 255, 255]],dtype=np.uint8)
kpt_color  = pose_palette[[16, 16, 16, 16, 16, 0, 0, 0, 0, 0, 0, 9, 9, 9, 9, 9, 9]]
skeleton = [[16, 14], [14, 12], [17, 15], [15, 13], [12, 13], [6, 12], [7, 13], [6, 7], [6, 8],
            [7, 9], [8, 10], [9, 11], [2, 3], [1, 2], [1, 3], [2, 4], [3, 5], [4, 6], [5, 7]]
limb_color = pose_palette[[9, 9, 9, 9, 7, 7, 7, 0, 0, 0, 0, 0, 16, 16, 16, 16, 16, 16, 16]]

if __name__ == '__main__':
    parser = argparse.ArgumentParser(description='YOLOv8-Pose Real-time Demo', add_help=True)
    parser.add_argument('--model_path', type=str, required=True,
                        help='model path, could be .rknn file')
    parser.add_argument('--target', type=str,
                        default='rk3566', help='target RKNPU platform')
    parser.add_argument('--device_id', type=str,
                        default=None, help='device id')
    args = parser.parse_args()

    # 1. 加载 RKNN 模型
    rknn = RKNN(verbose=False)
    ret = rknn.load_rknn(args.model_path)
    if ret != 0:
        print('Load RKNN model failed!')
        exit(ret)
    ret = rknn.init_runtime(target=args.target, device_id=args.device_id)
    if ret != 0:
        print('Init runtime failed!')
        exit(ret)
    print('Model & runtime ready.')

    # 2. 打开摄像头
    cap = cv2.VideoCapture(0)
    if not cap.isOpened():
        print('Cannot open camera.')
        exit(-1)

    model_w, model_h = 640, 640

    while True:
        ret, frame = cap.read()
        if not ret:
            break

        # 3. 预处理
        letterbox_img, ar, off_x, off_y = letterbox_resize(
            frame, (model_w, model_h), 56)
        infer_img = letterbox_img[..., ::-1]      # BGR→RGB
        infer_img = infer_img.astype(np.float32)

        # 4. RKNN 推理
        results = rknn.inference(inputs=[infer_img])

        # 5. 后处理
        outputs = []
        keypoints = results[3]
        for x in results[:3]:
            idx, stride = 0, 0
            if x.shape[2] == 20:
                stride, idx = 32, 20*4*20*4 + 20*2*20*2
            elif x.shape[2] == 40:
                stride, idx = 16, 20*4*20*4
            elif x.shape[2] == 80:
                stride, idx = 8, 0
            feature = x.reshape(1, 65, -1)
            outputs += process(feature, keypoints, idx,
                               x.shape[3], x.shape[2], stride)
        predbox = NMS(outputs)

        # 6. 画框、画关键点
        for box in predbox:
            xmin = int((box.xmin - off_x) / ar)
            ymin = int((box.ymin - off_y) / ar)
            xmax = int((box.xmax - off_x) / ar)
            ymax = int((box.ymax - off_y) / ar)
            cv2.rectangle(frame, (xmin, ymin), (xmax, ymax), (0, 255, 0), 2)
            cv2.putText(frame, f"{CLASSES[box.classId]}:{box.score:.2f}",
                        (xmin, ymin - 5), cv2.FONT_HERSHEY_SIMPLEX,
                        0.7, (0, 0, 255), 2, cv2.LINE_AA)

            kpts = box.keypoint.reshape(-1, 3)
            kpts[..., 0] = (kpts[..., 0] - off_x) / ar
            kpts[..., 1] = (kpts[..., 1] - off_y) / ar

            # 画点
            for k, (x, y, conf) in enumerate(kpts):
                if x != 0 and y != 0:
                    cv2.circle(frame, (int(x), int(y)), 5,
                               [int(c) for c in kpt_color[k]], -1)

            # 画骨架
            for k, sk in enumerate(skeleton):
                pos1 = (int(kpts[sk[0]-1, 0]), int(kpts[sk[0]-1, 1]))
                pos2 = (int(kpts[sk[1]-1, 0]), int(kpts[sk[1]-1, 1]))
                if 0 in pos1 + pos2:
                    continue
                cv2.line(frame, pos1, pos2,
                         [int(c) for c in limb_color[k]], 2, cv2.LINE_AA)

        # 7. 实时显示
        cv2.imshow('YOLOv8-Pose', frame)
        if cv2.waitKey(1) & 0xFF == ord('q'):
            break

    cap.release()
    cv2.destroyAllWindows()
    rknn.release()
2.运行视频流推理
python3 yolov8_pose_video.py --model_path ../model/yolov8_pose.rknn --target rk3576