DshanPI-A1测评第二篇:手势识别编程环境搭建与屏幕调试
本次测评我将会安装手势识别系统的必要工具和调试屏幕
硬件与环境准备
在开始之前,我们先明确手头的装备和环境:
-
核心板:Dshanpi-A1,主控为瑞芯微RK3576芯片。
-
屏幕:一块480x800分辨率的MIPI屏幕。
-
系统:Buildroot Linux系统。
-
官方的SDK
安装开发工具
下面是本次的清单:
| 软件包/配置类别 | 推荐选项与作用 |
|---|---|
| Python环境 | python3: 核心解释器。 python-pip: 用于安装未包含在Buildroot中的Python包。 python-numpy: 为OpenCV等库提供高效的数值计算支持。 python-setuptools: 一些Python包的基础构建依赖。 |
| 计算机视觉与图像处理 | opencv4: 务必启用 python3 支持。提供核心的计算机视觉库,用于图像处理和手势识别算法。 opencv4 贡献模块: 包含额外的、更先进的算法。 |
| 摄像头与显示支持 | gstreamer1 及相关插件: 构建摄像头图像采集和屏幕显示的管道。 gst1-plugins-base, gst1-plugins-good, gst1-plugins-bad, gst1-plugins-ugly: 提供丰富的编解码器和功能元件。 gst1-python: 允许在Python中创建和操作GStreamer管道。 |
SDK配置流程
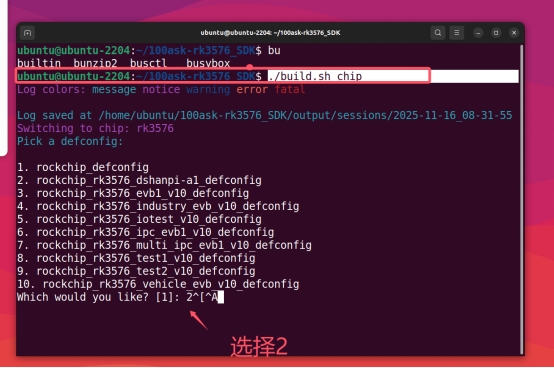
1. 选择芯片类型
./build.sh chip
![]()
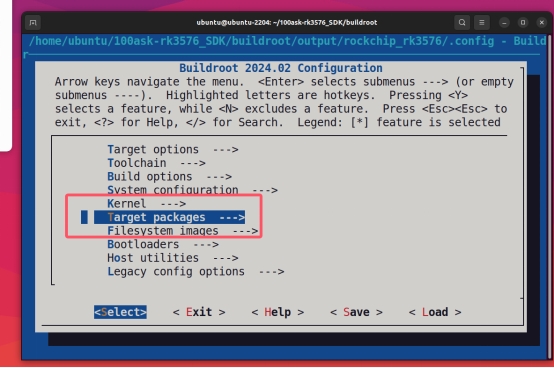
2. 进入buildroot配置
cd buildroot
make menuconfig
![]()
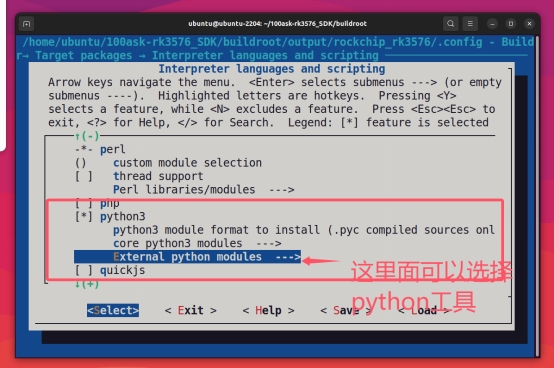
3. 选择Target packages
4. 安装Python环境
当找不到安装路径时,可按/键进入搜索:
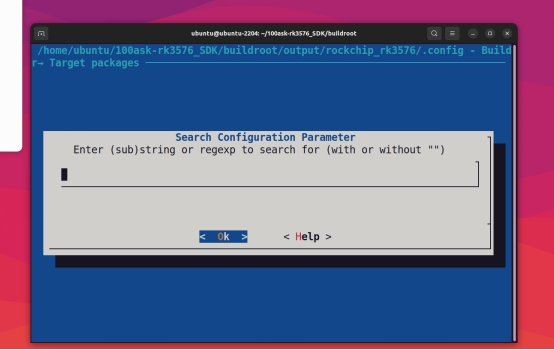
输入python3进行搜索:
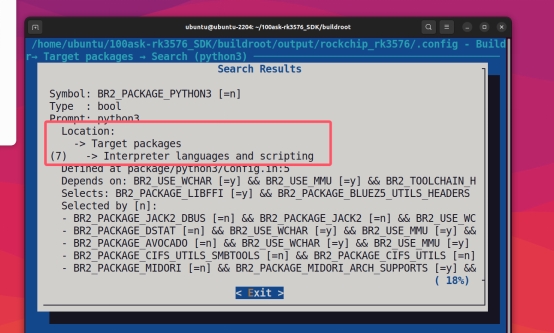
进入显示的Location路径进行配置:
![]()
5. 保存配置并编译
make
回到SDK主目录运行:
./build.sh rootfs
./build.sh updateimg
最后烧录运行到开发板
开发板调试
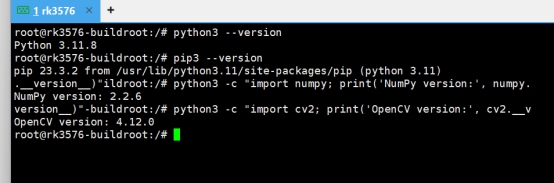
检查工具安装情况
python3 --version
pip3 --version
python3 -c "import numpy; print('NumPy version:', numpy.__version__)"
python3 -c "import cv2; print('OpenCV version:', cv2.__version__)"
屏幕调试
问题分析
系统已运行Weston合成器,这意味着我们有一个图形界面环境。尝试直接操作FrameBuffer(/dev/fb0)无效,因为Weston已占用显示接口。
通过系统检查发现:
/dev/fb0设备存在- 屏幕状态为
connected - 分辨率为480x800

解决方案:GStreamer + Wayland
GStreamer基础测试
gst-launch-1.0 videotestsrc pattern=smpte ! video/x-raw,width=480,height=800 ! waylandsink sync=false

摄像头直连显示测试
gst-launch-1.0 v4l2src device=/dev/video11 ! video/x-raw,width=640,height=480 ! videoconvert ! waylandsink sync=false
注意:请将device参数替换为您的摄像头设备节点
测试脚本
#!/usr/bin/env python3
# fixed_display_test.py
import subprocess
import time
import os
def check_camera_devices():
"""检查可用的摄像头设备"""
print("=== 摄像头设备检查 ===")
try:
# 使用v4l2-ctl检查设备
result = subprocess.run(["v4l2-ctl", "--list-devices"],
capture_output=True, text=True)
if result.returncode == 0:
print("找到的视频设备:")n print(result.stdout)
else:
print("v4l2-ctl命令执行失败")
except Exception as e:
print(f"检查摄像头设备失败: {e}")
# 测试常见的摄像头设备
camera_devices = ["/dev/video11", "/dev/video0", "/dev/video1", "/dev/video2"]
print("\n测试摄像头设备:")
for device in camera_devices:
if os.path.exists(device):
print(f"测试设备: {device}")
try:
# 尝试使用GStreamer测试摄像头
cmd = [
"gst-launch-1.0",
"-v",
"v4l2src", f"device={device}", "!",
"video/x-raw,width=640,height=480,framerate=15/1", "!",
"videoconvert", "!",
"waylandsink", "sync=false"
]
process = subprocess.Popen(cmd)
time.sleep(3) # 显示3秒
process.terminate()
process.wait()
print(f" {device}: 摄像头工作正常")
return device
except Exception as e:
print(f"{device}: 测试失败 - {e}")
else:
print(f"{device}: 设备不存在")
return None
def test_static_patterns():
"""测试静态图案(不会变化)"""
print("\n=== 静态图案测试 ===")
# 设置Wayland环境
os.environ['WAYLAND_DISPLAY'] = 'wayland-0'
# 测试静态图案(不会变化)
static_patterns = [
("smpte100", "SMPTE 100%色彩条"),
("ball", "时钟图案"),
("blink", "闪烁图案"),
("pinwheel", "风车图案"),
("spokes", "辐条图案"),
]
for pattern, description in static_patterns:
print(f"显示: {description}")
try:
cmd = [
"gst-launch-1.0",
"videotestsrc", f"pattern={pattern}", "!",
"video/x-raw,width=480,height=800,framerate=15/1", "!",
"waylandsink", "sync=false"
]
process = subprocess.Popen(cmd)
time.sleep(3)
process.terminate()
process.wait()
print(f"{description} 显示成功")
except Exception as e:
print(f"{description} 显示失败: {e}")
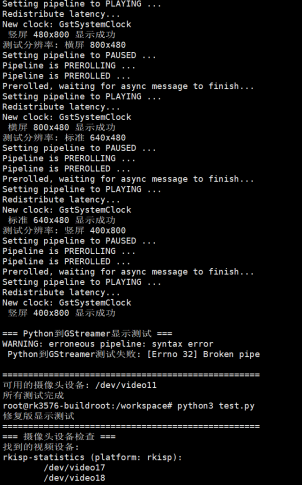
def test_custom_resolution():
"""测试自定义分辨率显示"""
print("\n=== 自定义分辨率测试 ===")
resolutions = [
(480, 800, "竖屏 480x800"),
(800, 480, "横屏 800x480"),
(640, 480, "标准 640x480"),
(400, 800, "竖屏 400x800"),
]
for width, height, desc in resolutions:
print(f"测试分辨率: {desc}")
try:
cmd = [
"gst-launch-1.0",
"videotestsrc", "pattern=smpte100", "!",
f"video/x-raw,width={width},height={height},framerate=15/1", "!",
"videoconvert", "!",
"waylandsink", "sync=false"
]
process = subprocess.Popen(cmd)
time.sleep(2)
process.terminate()
process.wait()
print(f" {desc} 显示成功")
except Exception as e:
print(f" {desc} 显示失败: {e}")
if __name__ == "__main__":
print("=" * 50)
# 1. 检查摄像头
camera_device = check_camera_devices()
# 2. 测试静态图案
test_static_patterns()
# 3. 测试不同分辨率
test_custom_resolution()
print("\n" + "=" * 50)
if camera_device:
print(f"可用的摄像头设备: {camera_device}")
else:
print("未找到可用的摄像头设备")
print("所有测试完成")
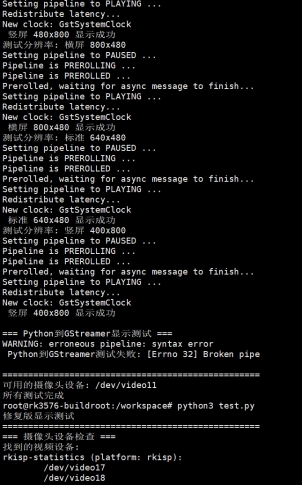
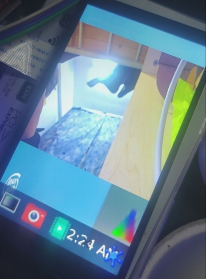
运行结果
演示视频我会放在附件里面
番外篇:FileZilla文件传输
FileZilla连接设置
FileZilla - The free FTP solution
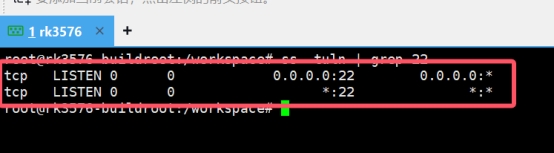
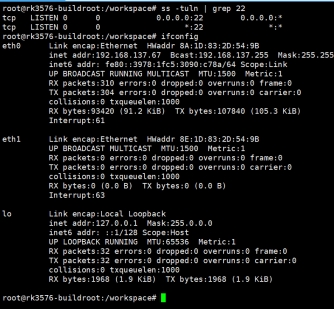
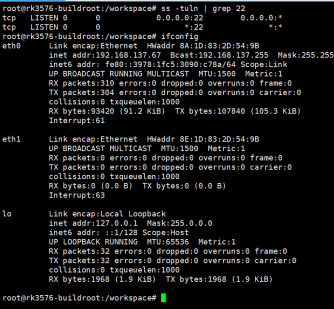
检查SSH服务
ss -tuln | grep 22
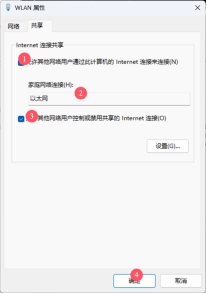
网络共享设置
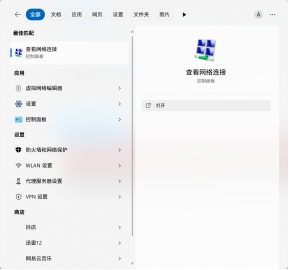
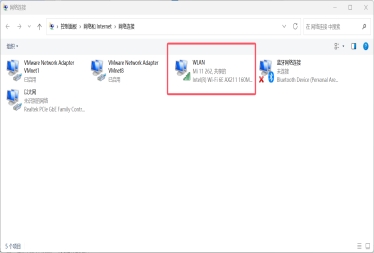
选择能上网的网络,点击属性:
连接开发板
ifconfig
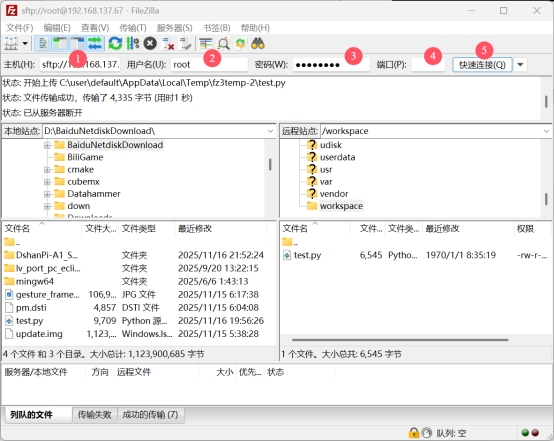
使用FileZilla连接:
- IP:开发板IP地址
- 用户名:root
- 密码:rockchip
- 端口:22
总结
回顾整个调试过程,以下几个关键点值得特别注意:
-
显示路径选择:在运行Weston这类合成器的系统上,优先使用GStreamer + waylandsink的方案来显示图像,而非直接操作FrameBuffer。
-
摄像头设备节点:务必使用
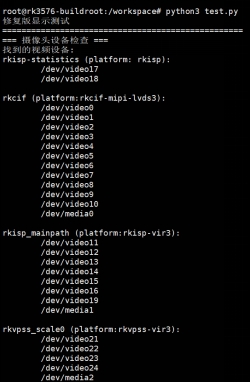
v4l2-ctl --list-devices命令确认摄像头对应的设备节点,并在代码中正确指定。 -
屏幕分辨率:注意系统识别到的屏幕分辨率(可通过
cat /sys/class/drm/card0-DSI-1/modes查询)可能与物理分辨率略有不同,在创建显示帧时需以此为准或进行调整。
至此,我们成功地在Dshanpi A1开发板上搭建起了手势识别的编程环境,并解决了MIPI屏幕和摄像头的显示问题。虽然过程曲折,但为后续实际编写手势识别算法奠定了坚实的基础。希望我的这些经验能对大家有所帮助!