OPENWRT System 1: A1 Board Introduction and Development Environment Setup

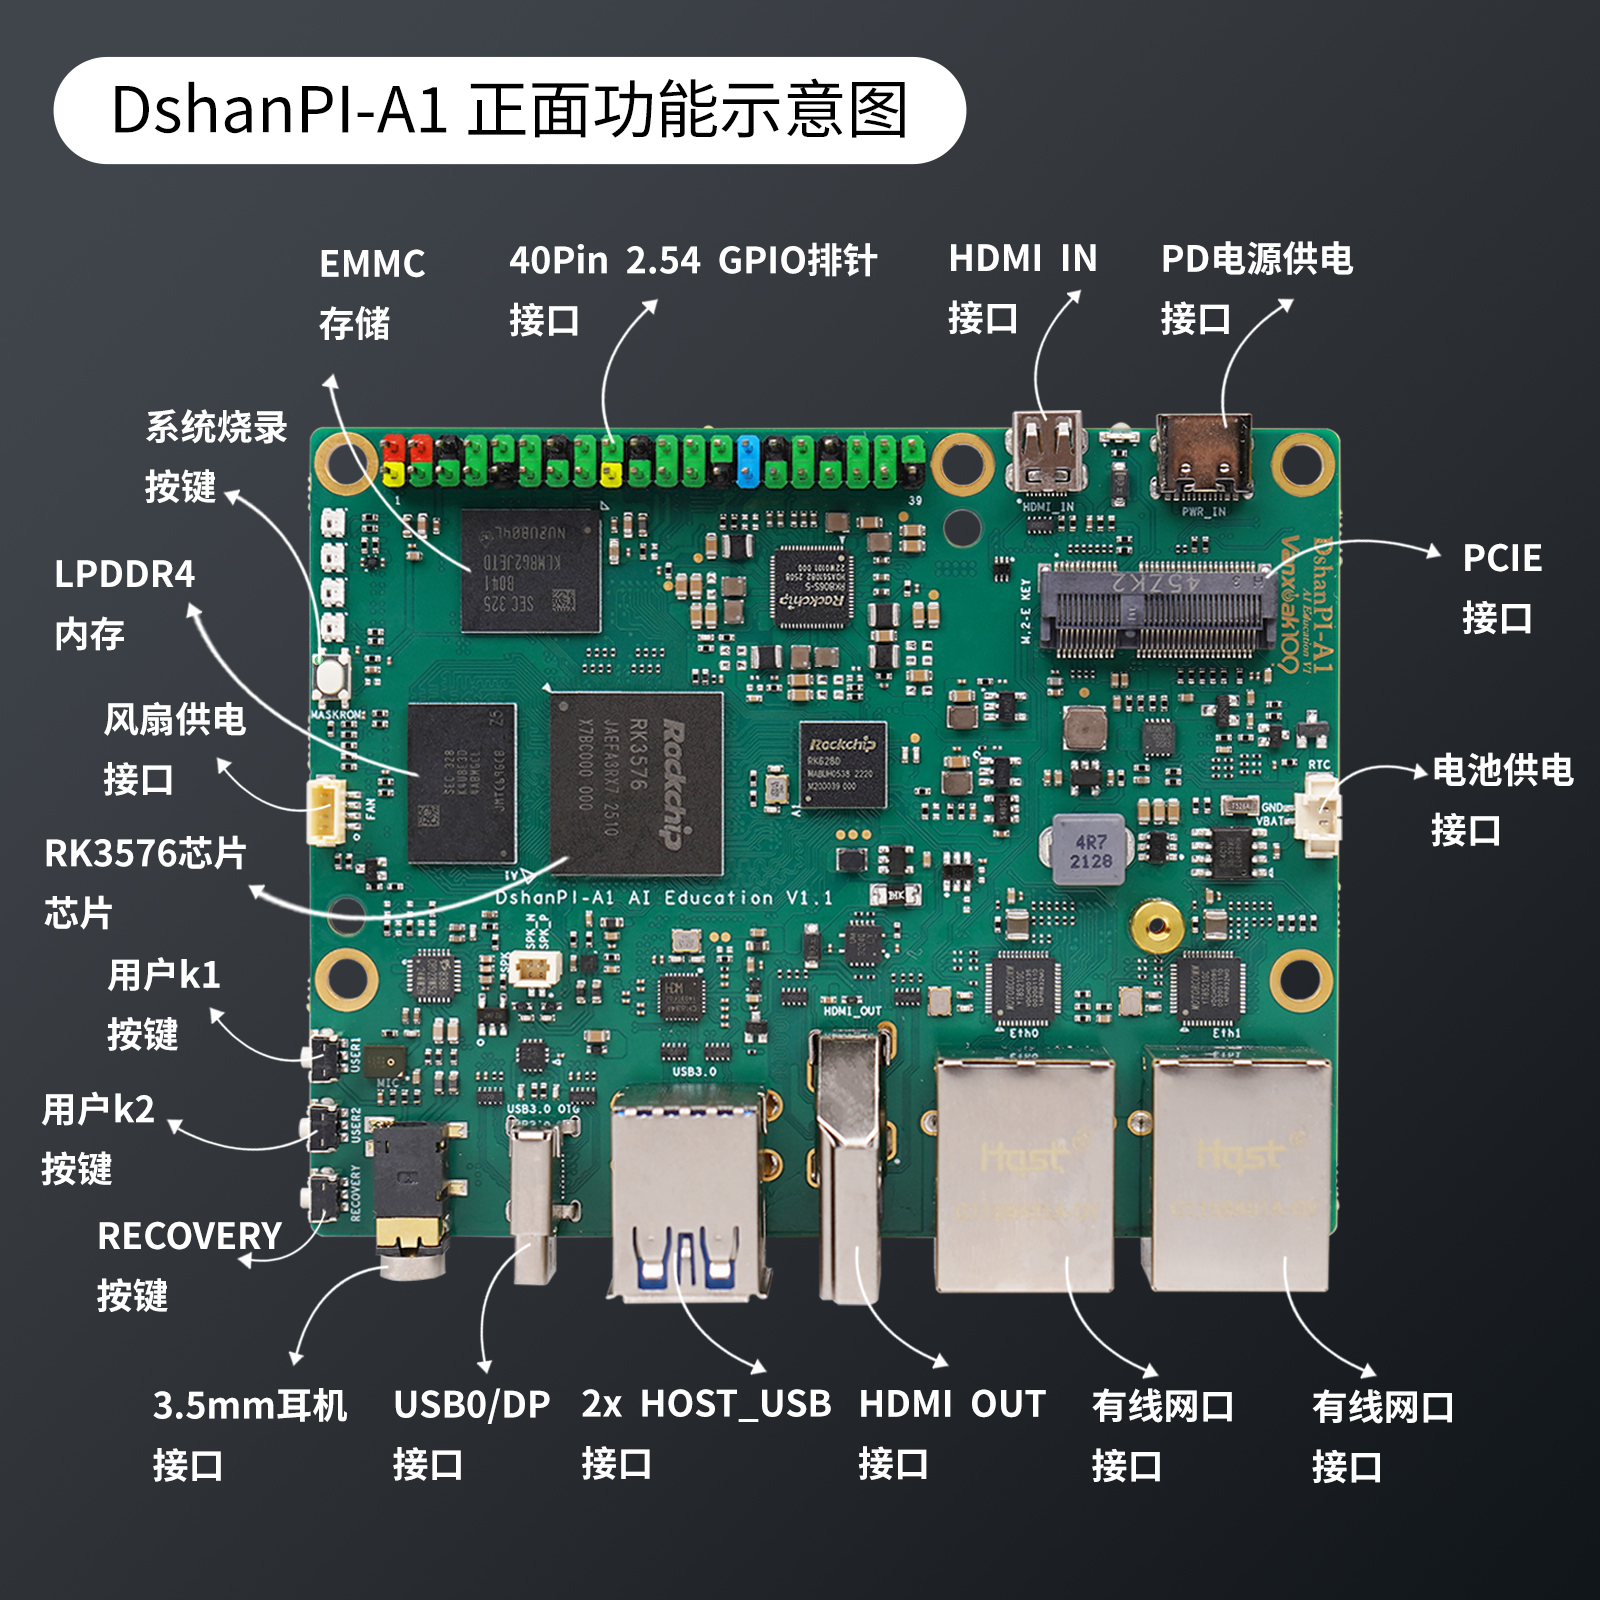
The board has rich peripheral interfaces, and the onboard SOC delivers strong performance, providing a mid-to-high-end performance SBC (Single Board Computer) experience, smart router, etc. Below are some corresponding application scenario examples:
- Smart standalone mini computer, with office, education, programming development, embedded development and other functions
- Personal git repository, server, NAS, soft router, private cloud
- Robot, drone and other projects
- TV box, smart home hub, home security monitoring, smart speaker and other smart devices
The goal of this project is to build a lightweight NAS (lightweight NAS) application based on the DShanPl-A1 Education single-board. The best implementation path is to adopt the mature and highly extensible open-source routing system OpenWrt LEDE. With OpenWrt's complete Linux environment and rich ecological plugins, we can install storage services, network services, intranet penetration, secure access and other functional modules in the system as needed. Through the collaborative configuration among these plugins, combined with OpenWrt's powerful network management capabilities, a lightweight NAS solution based on a soft router architecture can be built.
Development Environment
Environment Description
The official OpenWrt build recommends using the native GNU/Linux environment, but it also supports building using Windows WSL mode. Using a WSL development environment on Windows eliminates the need to configure a virtual machine environment, and can also be used in environments where installing VMware is restricted. Therefore, the author's build and development environment mostly prioritizes using WSL.
WSL (Windows Subsystem for Linux) provides a native-level Linux environment on Windows, suitable for developers to carry out cross-platform or Linux-related project development. Its main advantages include:
- Lightweight and fast: No virtual machine or dual system is needed. Startup and running are almost as fast as native Linux, with low resource consumption.
- Seamless integration with Windows: Can directly access the Windows file system, and use Windows tools (such as VSCode, browser) together with Linux tools.
- Native Linux experience: Supports most Linux commands, package managers, and build tools. You can directly compile, debug, and run services.
- Easy to install and maintain: One-click installation from the Microsoft Store. System updates and environment switching are very convenient.
- Excellent development experience: Supports mainstream development environments such as Docker (WSL2), Git, Python, Node.js, C/C++, suitable for embedded, server, network, AI and other fields.
- Good cross-platform compatibility: Can build Linux-runnable software on Windows, such as compiling OpenWrt, building drivers, generating cross-compiled packages, etc.
Environment Variable Configuration
Refer to the official documentation: Build system setup WSL
In the WSL environment, in the build user's .bashrc, add the corresponding configuration information according to the instructions below to solve the problem that Windows environment variables are also effective by default in WSL. After this setting, the environment is basically consistent with the native GNU/LINUX environment, and there will be no issues with WSL's import mechanism.
# GO build configuration, if it cannot be built, open this
#export GO111MODULE=on
#export GOPROXY=https://goproxy.cn

# proxy, replace this with the proxy service IP:PORT of your own Windows environment
export http_proxy=http://192.168.31.50:6080
export https_proxy=http://192.168.31.50:6080

export REPO_URL='https://mirrors.tuna.tsinghua.edu.cn/git/git-repo'

# Filter Windows PATH stuff
export PATH=$(echo $PATH | sed -e 's|:[^:]*WindowsApps[^:]*||g')
export PATH=$(echo $PATH | tr ':' '\n' | grep -v NVIDIA | tr '\n' ':')
export PATH=$(echo $PATH | tr ':' '\n' | grep -v 'Files' | paste -sd ':' -)
export PATH=$(echo $PATH | tr ':' '\n' | grep -v 'VS' | paste -sd ':' -)
export PATH=$(echo $PATH | tr ':' '\n' | grep -v '/mnt/' | paste -sd ':' -)
WSL Network Proxy Settings
Since some tool packages are on GitHub, default network downloads may often fail. We can choose to run the corresponding proxy software on Windows, then enable allowing other devices to connect, and then configure the corresponding http_proxy and https_proxy environment variables in WSL, which can conveniently accelerate GitHub access.
Below are some configuration examples:
- Proxy software enables LAN device connection

- Set the network mode to Mirrored in WSL Settings
For more details, please refer to Microsoft's official documentation: Access network applications with WSL - Mirrored mode networking

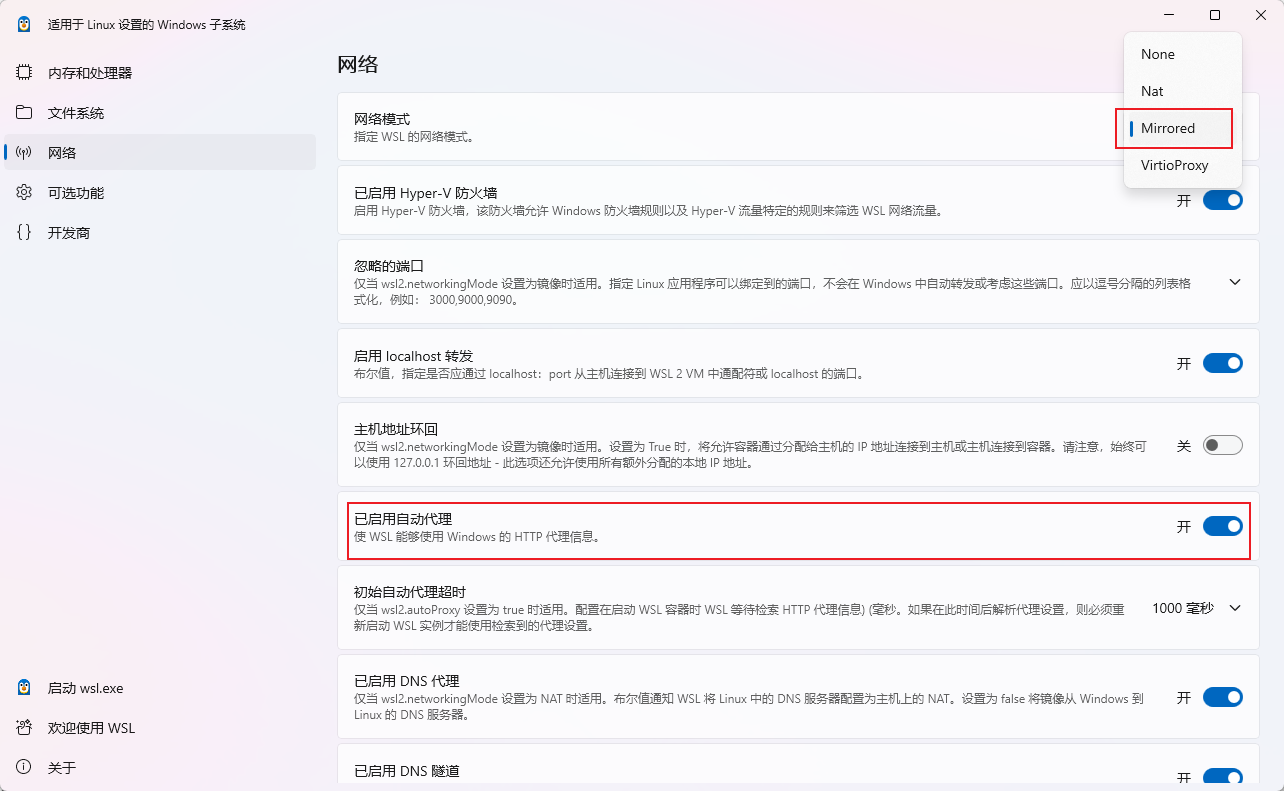
- After configuration, first run wsl --shutdown, and then restart wsl ubuntu
- Check whether the environment variable WSL_PAC_URL has been configured successfully. A successful example is as follows:

- Configure terminal http and https proxies, with automatic PAC filtering
export http_proxy=$WSL_PAC_URL
export https_proxy=$WSL_PAC_URL
Tips: You can directly write this into the current user's .bashrc, so you don't have to execute the proxy settings every time.
Flashing Test Method
This section introduces the basic method of flashing the LEDE image. You need to master the method of flashing the image in advance. Below is a detailed step-by-step introduction.
Hardware Connection
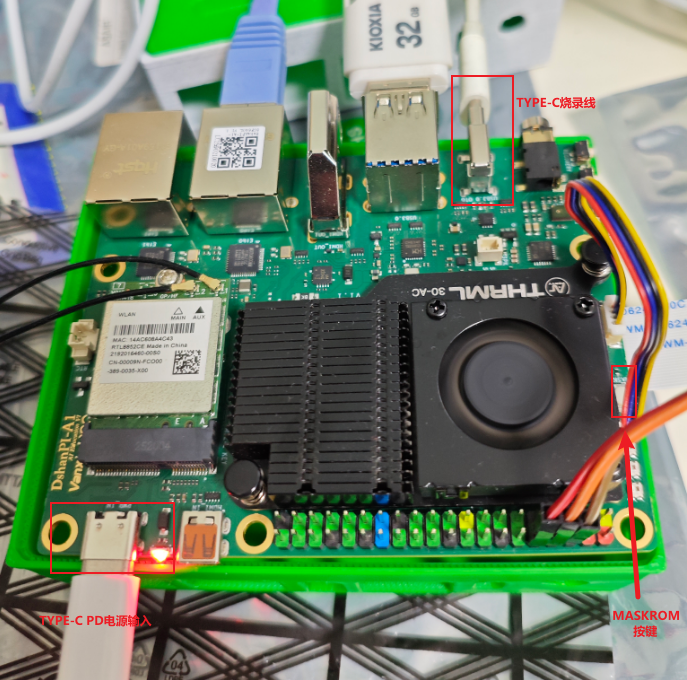
To flash the system image, in addition to the dshanpi-a1 board, you also need to prepare TypeC USB cable, 30W PD power adapter (recommended to purchase from Weidongshan store), as shown below:
Install Driver and Flashing Software
The tool packages and image files that need to be downloaded are as follows:
- OpenWrt system image: DshanPi-A1_OpenWrt_Image (provided by 100ask)
- Flashing tool RKDevTool: RKDevTool_Release_v3.32.zip
- Driver installation tool package DriverAssitant: DriverAssitant_v5.1.1.zip
- DshanPi-A1 bootloader firmware: rk3576_spl_loader_v1.09.107.bin

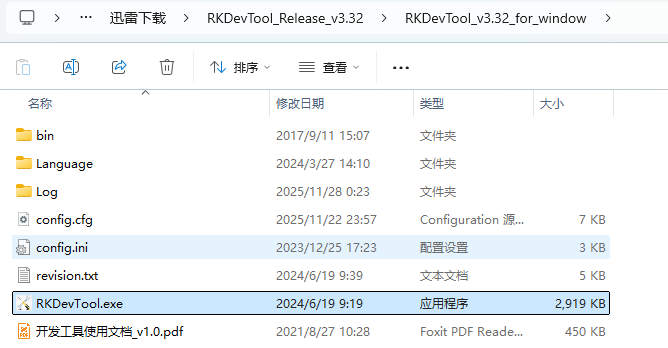
Extract the flashing tool RKDevTool_Release_v3.32.zip downloaded from the previous link, and then directly double-click RKDevTool.exe.
Start Flashing
After the preparation is complete, follow the steps below to make the device enter the MASKROM flashing mode:1. Connect the usb2.0/3.0 otg cable (i.e., the type-c flashing data cable, the other end of the data cable connects to the computer's USB2.0/3.0 blue port);
2. Press and hold the **<font style={{color: 'rgb(28, 30, 33)', backgroundColor: 'rgb(246, 247, 248)'}}>MASKROM</font>** button, do not release it first ;
3. Then connect the power supply, and the dshanpi-a1 will enter the **<font style={{color: 'rgb(28, 30, 33)', backgroundColor: 'rgb(246, 247, 248)'}}>MASKROM</font>** flashing mode;
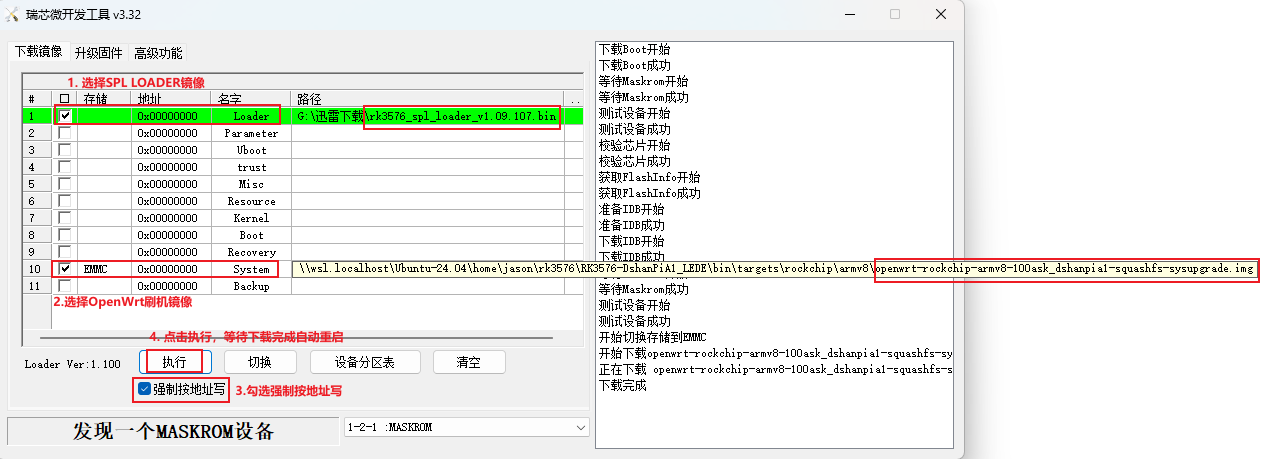
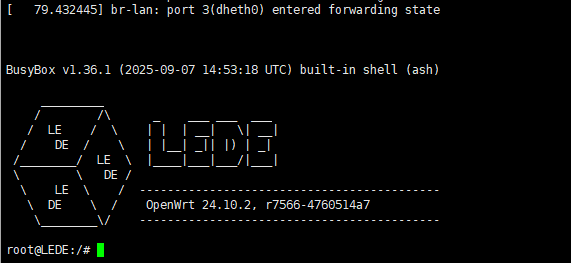
jason@ubuntu24:~/LEDE/bin/targets/rockchip/armv8$ gunzip -k openwrt-rockchip-armv8-100ask_dshanpia1-squashfs-sysupgrade.img.gz -f
gzip: openwrt-rockchip-armv8-100ask_dshanpia1-squashfs-sysupgrade.img.gz: decompression OK, trailing garbage ignored

# Wait for the img image file input
jason@ubuntu24:~/LEDE/bin/targets/rockchip/armv8$ ls -lh openwrt-rockchip-armv8-100ask_dshanpia1-squashfs-sysupgrade.img
-rw-r--r-- 1 jason jason 640M Nov 28 02:24 openwrt-rockchip-armv8-100ask_dshanpia1-squashfs-sysupgrade.img