2 posts tagged with "Buildroot"

View All Tags

DshanPI-A1 Review Part 1: Building the buildroot System and Debugging the IMX415 Camera

· 7 min read
Yuxuan
100askTeam yuxuan.

Board Introduction

DshanPi-A1 is a high-performance AI embedded development board developed by Shenzhen Baiwen Web (Weidongshan Team). It is based on the Rockchip RK3576 chip and is designed specifically for AI education, edge computing, and smart device development.
img

Core Specifications

ParameterSpecification
Main SoCRockchip RK3576, 8nm process, octa-core 64-bit 4×Cortex-A72(2.2GHz)+4×Cortex-A53(1.8GHz) Rockchip Electronics Co., Ltd.
AI ComputeBuilt-in dedicated NPU, 6TOPS compute capability, supports INT4/INT8/INT16 mixed-precision operations
Memory/StorageOnboard LPDDR4/4X memory, supports eMMC and UFS storage expansion, SD card slot
Display InterfaceHDMI v2.1/eDP v1.3 combo interface, MIPI DSI (4-lane) Rockchip Electronics Co., Ltd.
Video DecodingSupports 8K@30fps, 4K@120fps high-definition video
Network ConnectivitySupports WiFi6/BLE5.2 (requires external module), Gigabit Ethernet port (some versions)
USB InterfaceMultiple USB3.0/2.0 (Type-C and Type-A) Rockchip Electronics Co., Ltd.
Other InterfacesUART, I2C, SPI, GPIO, audio interface, CAN bus (some versions)
PowerSupports 30W PD fast charging (Type-C interface)
DimensionsCompact design (specific dimensions not publicly disclosed)

Product Features

1️⃣ Powerful AI Processing Capability

· 6TOPS dedicated NPU can smoothly run lightweight large language models such as DeepSeek and Qwen

· Supports mainstream AI frameworks (TensorFlow, PyTorch, MXNet, etc.)

· Suitable for AI application development such as image recognition, speech processing, and smart surveillance

2️⃣ Rich Multimedia Performance

· Supports 8K video decoding, can be used as an HD media center

· HDMI IN function allows the development board to be used as a secondary display for a PC

· Built-in audio codec, supports 3.5mm audio output

3️⃣ Comprehensive Development Support

· Ships with DShanOS (Baiwen Web's self-developed Linux distribution)

· Comes with free teaching courses and documentation, lowering the learning barrier

· Supports Armbian system, with official image downloads available

· Provides a complete SDK and sample code for easy secondary development

4️⃣ Flexible Expansion Capability

· All GPIO interfaces are exposed, making it easy to connect various sensors and actuators

· Supports multiple communication protocols, suitable for IoT application development

· Can connect external cameras, displays, WiFi/4G modules, and more to expand functionality

Application Scenarios

· AI Education and Learning: Suitable for embedded AI course teaching and experimentation

· Edge Computing Devices: Can deploy lightweight AI models to enable local intelligent decision-making

· Smart Home Hub: Build a high-performance, low-power smart home control center

· Industrial Automation: Suitable for smart device monitoring and data acquisition

· Commercial Display: Supports 8K display, can be used for advertising machines and information publishing systems

· AI Vision Systems: Can be used for face recognition, object detection, and other scenarios

Companion Resources

· Official documentation site: https://wiki.dshanpi.org/docs/dshanpi-a1/

· Developer community: Weidongshan Embedded Developer Community (100ask.org)

· QQ technical exchange group: 798273638

· Free tutorials: Provides AI development courses from basic to advanced

buildroot SDK Installation

1. Obtain the Official Virtual Machine

https://pan.baidu.com/s/15M8zuHOwl_SITl6cSk_7Vg?pwd=eaax Extraction code: eaax

2. Install and open vmware, run the virtual machine

Enter the ubuntu system, the account password is ubuntu

img

3. Build the SDK

Open the virtual machine and execute the following command to enter the SDK root directory:

cd ~/100ask-rk3576_SDK/

img

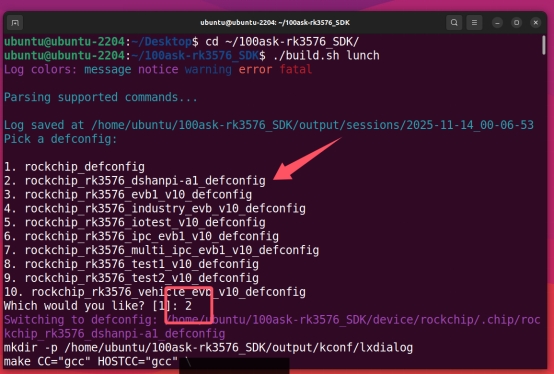
Select the configuration file:

./build.sh lunch
img

4. Build

Run the following command

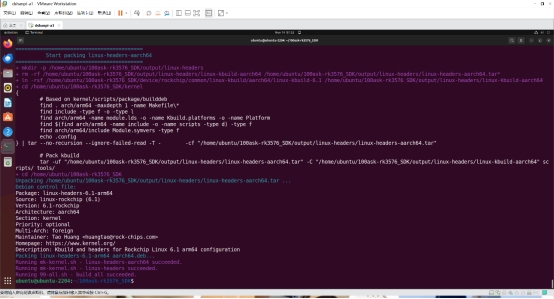
./build.sh

img

Wait for the build to finish

img

Device Tree Modification to Enable the Camera Node

Enter

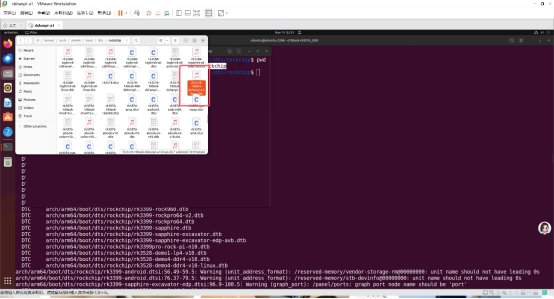
/home/ubuntu/100ask-rk3576_SDK/kernel/arch/arm64/boot/dts/rockchip

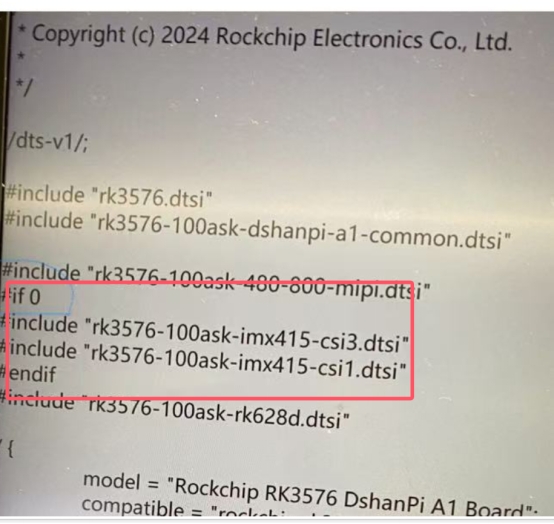
Modify the file shown in the picture
img

img

Change to if1

Return to the SDK directory and use

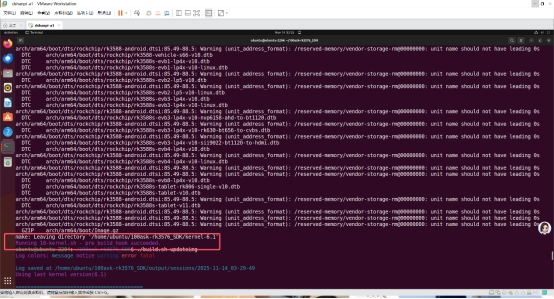
./build.sh kernel

img

img

Finally

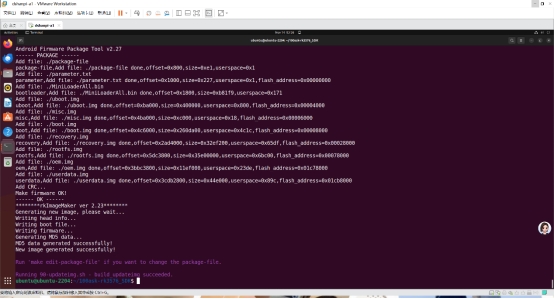
./build.sh updateimg

img

img

Finally, upload and flash (remember to enter MASKROM)
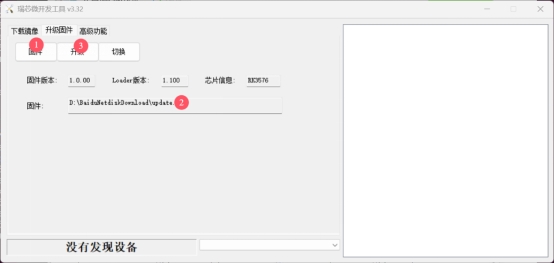
img

Results

img

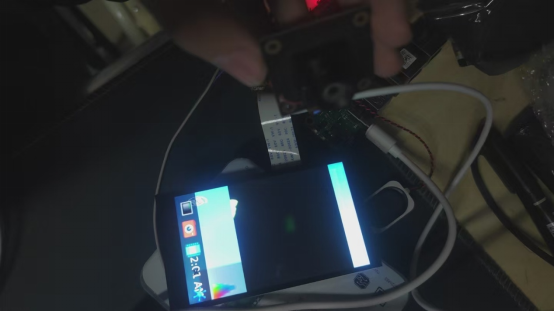
But there is still a bug, the screen camera color is still not displayed correctly.

Problem Solving

At first, I suspected that the camera's .xml (.json) was not loaded. After debugging for a long time, there was still no result.

After extensive debugging, I finally found a solution:

Step 1: Discover Key Clues from media-ctl Output

In the output of media-ctl -p -d /dev/media0, I noticed this key information:

entity 63: m00_b_rk628-csi9-0051 (1 pad, 1 link)
type V4L2 subdev subtype Sensor flags 0
device node name /dev/v4l-subdev2
pad 0: Source
[fmt:UYVY8_2X8/64x64@10000/600000 field:none]
-> "rockchip-csi2-dphy0":0 [ENABLED] ←note the [ENABLED] here

img

Analysis Points:

· A rk628-csi sensor entity exists in the system

· Its link state is [ENABLED], meaning it is occupying CSI hardware resources

· But the resolution is only 64x64, which is obviously not a normal camera output

Step 2: Discover from dmesg Logs that IMX415 Driver Is Normal

From the output of dmesg | grep -i imx415:

[3.459474] imx415 3-0037: Detected imx415 id 0000e0
[3.515523] imx415 3-0037: Consider updating driver imx415 to match on endpoints
[3.515557] rockchip-csi2-dphy csi2-dphy3: dphy3 matches m01_f_imx415 3-0037: bustype 5

Analysis Points:

· The IMX415 sensor was correctly detected (ID: 0000e0)

· The driver loaded successfully and even established a matching relationship with CSI-DPHY

· But there is no message indicating successful V4L2 sub-device creation

Step 3: Infer Hardware Connections from Device Tree Structure

From the device tree snippet:

&csi2_dphy3 {
port@0 {
mipi_in_ucam3: endpoint@1 {
remote-endpoint = <&imx415_out0>; ←IMX415 connects here
data-lanes = <1 2 3 4>;
};
};
port@1 {
csidphy3_out: endpoint@0 {
remote-endpoint = <&mipi3_csi2_input>;
};
};
};

Analysis Points:

· IMX415 is connected to the system via CSI-DPHY3

· But the actual media-ctl output shows that rockchip-csi2-dphy0 is occupied

· This indicates that there may be a resource allocation issue among multiple CSI interfaces

Step 4: Infer Registration Failure from the Missing V4L2 Sub-device

When running the check command:

ls /sys/bus/i2c/devices/3-0037/v4l-subdev*/media_device/
# Output: No such file or directory

img

Analysis Points:

· The I2C device 3-0037 exists and the driver binding is normal

· But no corresponding V4L2 sub-device was created

· This usually means the driver probed successfully, but the subsequent V4L2 registration failed

Step 5: Connect All Clues to Form a Complete Picture

Stringing the above clues together:

1. Symptom: IMX415 driver loaded but no V4L2 device

2. Evidence 1: rk628-csi is occupying the CSI link and its status is [ENABLED]

3. Evidence 2: IMX415 I2C communication is normal but the media device is missing

4. Evidence 3: The device tree shows that the two may share CSI hardware resources

Logical Reasoning:

· If the IMX415 hardware is faulty -> I2C probing should fail

· If there is an IMX415 driver issue -> dmesg should have error logs

· If the device tree configuration is wrong -> CSI matching would not succeed

· The only reasonable explanation: the hardware resources are occupied by another device

Step 6: Start Practicing
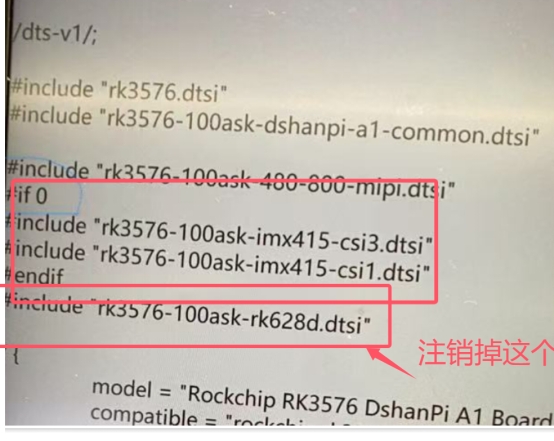
img

Recompile the device tree and flash the development board, it runs perfectly!
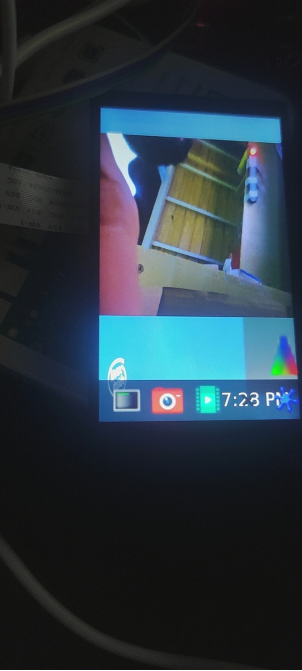
img

img

Summary

  1. Hardware resource conflicts in embedded devices are common hidden issues, especially when multiple devices share links such as CSI and I2C. The device occupation status should be a key focus of investigation.

  2. During development, make full use of tools such as media-ctl and dmesg, combined with device tree configuration analysis, to quickly locate resource allocation issues and avoid blind debugging.

  3. For scenarios where the driver loads normally but functions abnormally, prioritize investigating key aspects such as hardware resource occupation and V4L2 sub-device registration to narrow down the scope of the problem.

  4. The CSI interface resource allocation of the DshanPi-A1 development board must be precisely configured through the device tree. After modification, strictly follow the Buildroot build process to regenerate the image to ensure the configuration takes effect.
DshanPI-A1 Setting Up the RKNN Environment under Buildroot

· 15 min read
Yuxuan
100askTeam yuxuan.

Development Environment

PC side: ubuntu22.04-x86-64

Board side: buildroot

The specific theoretical part won't be elaborated here; there's plenty online. This records the entire operation process, divided into two main parts: 1. PC side 2. Board side

1. PC Side

Setting Up the RKNN-Toolkit2 Environment

# Download the code repository
mkdir rknn
cd rknn
wget https://dl.100ask.net/Hardware/MPU/RK3576-DshanPi-A1/utils/rknn-toolkit2.zip
unzip rknn-toolkit2.zip
wget https://dl.100ask.net/Hardware/MPU/RK3576-DshanPi-A1/utils/rknn_model_zoo.zip
unzip rknn_model_zoo.zip
# Set up conda environment
wget -c https://repo.anaconda.com/archive/Anaconda3-2025.06-1-Linux-x86_64.sh
bash Anaconda3-2025.06-1-Linux-x86_64.sh
Please, press ENTER to continue
>>>
Do you accept the license terms? [yes|no]
>>> yes
Anaconda3 will now be installed into this location:
/home/ubuntu/anaconda3
- Press ENTER to confirm the location
- Press CTRL-C to abort the installation
- Or specify a different location below

[/home/ubuntu/anaconda3] >>>
You can undo this by running `conda init --reverse $SHELL`? [yes|no]
[no] >>> yes
Thank you for installing Anaconda3!
# Activate environment variables
source ~/.bashrc
# Create RKNN environment
conda create -n rknn-toolkit2 python=3.8
conda activate rknn-toolkit2
# Install RKNN-Toolkit2
cd rknn-toolkit2/rknn-toolkit2/packages/x86_64/
conda install compilers cmake
pip install -r requirements_cp38-2.3.2.txt
pip install rknn_toolkit2-2.3.2-cp38-cp38-manylinux_2_17_x86_64.manylinux2014_x86_64.whl
# Verify installation
(rknn-toolkit2) ubuntu@ubuntu-2204:~/rknn/rknn-toolkit2/rknn-toolkit2/packages/x86_64$ python3
Python 3.8.20 (default, Oct 3 2024, 15:24:27)
[GCC 11.2.0] :: Anaconda, Inc. on linux
Type "help", "copyright", "credits" or "license" for more information.
>>> from rknn.api import RKNN
>>> exit()
(rknn-toolkit2) ubuntu@ubuntu-2204:~/rknn/rknn-toolkit2/rknn-toolkit2/packages/x86_64$

2. On-Board Inference

First, here is my environment: I use the buildroot that comes with the SDK, adapted by the 100ASK team, with rknnruntime already enabled, and I did not update the runtime.

root@rk3576-buildroot:/# uname -a
Linux rk3576-buildroot 6.1.75 #3 SMP Fri Nov 28 09:41:14 EST 2025 aarch64 GNU/Linux
root@rk3576-buildroot:/# find ./ -name *rknn*
./rockchip-test/npu2/model/RK356X/mobilenet_v1.rknn
./rockchip-test/npu2/model/RK3588/vgg16_max_pool_fp16.rknn
./sys/kernel/debug/clk/hclk_rknn_root
./sys/kernel/debug/clk/clk_rknn_dsu0
./sys/kernel/debug/clk/aclk_rknn0
./sys/kernel/debug/clk/aclk_rknn1
./sys/kernel/debug/clk/aclk_rknn_cbuf
./sys/kernel/debug/clk/hclk_rknn_cbuf
./usr/share/model/RK3562/mobilenet_v1.rknn
./usr/share/model/RK3566_RK3568/mobilenet_v1.rknn
./usr/share/model/RK3588/mobilenet_v1.rknn
./usr/share/model/RK3576/mobilenet_v1.rknn
./usr/lib/librknnrt.so
./usr/bin/start_rknn.sh
./usr/bin/rknn_common_test
./usr/bin/restart_rknn.sh
./usr/bin/rknn_server

tip: My buildroot configuration ./build.sh bconfig

 [*] Rockchip NPU power control for linux                                                  │ │
│ │ [ ] Rockchip NPU power control combine for linux │ │
│ │ [ ] Rockchip recovery for linux │ │
│ │ [ ] rkadk │ │
│ │ [ ] rknpu │ │
│ │ [ ] rknpu pcie │ │
│ │ [ ] python-rknn │ │
│ │ [*] rknpu2 │ │
│ │ [*] rknpu2 example │ │
│ │ [ ] rknpu firmware │ │
│ │ [ ] RKPARTYBOX demo │ │
│ │ [*] rockchip script

As you can see, I did not change the rknpu configuration; buildroot already configures the rknpu driver and rknnruntime by default.

Problem 1: Solving ADB Permission Issues on the PC Side

When running on-board inference on the PC, the following error occurs:

:(rknn-toolkit2) ubuntu@ubuntu-2204:~/rknn/rknn_model_zoo/examples/yolov8/python$ sudo python3 yolov8.py --target rk3576 --model_path ../model/yolov8.rknn --img_show
Traceback (most recent call last):
File "/home/ubuntu/rknn/rknn_model_zoo/examples/yolov8/python/yolov8.py", line 2, in <module>
import cv2
ModuleNotFoundError: No module named 'cv2'
(rknn-toolkit2) ubuntu@ubuntu-2204:~/rknn/rknn_model_zoo/examples/yolov8/python$ python3 yolov8.py --target rk3576 --model_path ../model/yolov8.rknn --img_show
I rknn-toolkit2 version: 2.3.2
--> Init runtime environment
adb: unable to connect for root: insufficient permissions for device: user in plugdev group; are your udev rules wrong?
See [http://developer.android.com/tools/device.html] for more information
I target set by user is: rk3576
E init_runtime: Get board target failed, ret code: 1. error: insufficient permissions for device: user in plugdev group; are your udev rules wrong?
See [http://developer.android.com/tools/device.html] for more information

E init_runtime: Traceback (most recent call last):
File "rknn/api/rknn_log.py", line 344, in rknn.api.rknn_log.error_catch_decorator.error_catch_wrapper
File "rknn/api/rknn_base.py", line 2566, in rknn.api.rknn_base.RKNNBase.init_runtime
File "rknn/api/rknn_runtime.py", line 223, in rknn.api.rknn_runtime.RKNNRuntime.__init__
File "rknn/api/rknn_platform.py", line 607, in rknn.api.rknn_platform.get_board_info
RuntimeError

Note this line

adb: unable to connect for root: insufficient permissions for device: user in plugdev group; are your udev rules wrong?
See [http://developer.android.com/tools/device.html] for more information

It indicates insufficient adbd permissions; fix it with:

# Add udev rules
echo 'SUBSYSTEM=="usb", ATTR{idVendor}=="2207", MODE="0666", GROUP="plugdev"' | sudo tee /etc/udev/rules.d/51-android.rules
# Reload rules
sudo udevadm control --reload-rules
sudo udevadm trigger
# Restart ADB
adb kill-server
adb start-server
adb devices
List of devices attached
8074683be1050187 device

Problem 2: Solving the Board-Side adbd Port 5037 Not Open Issue

Symptom:

# Run on-board inference
python3 yolov8.py --target rk3576 --model_path ../model/yolov8.rknn --img_show
I rknn-toolkit2 version: 2.3.2
--> Init runtime environment
adbd is already running as root
I target set by user is: rk3576
I Get hardware info: target_platform = rk3576, os = Linux, aarch = aarch64
I Check RK3576 board npu runtime version
W kill server failed while restarting, ret code: 1. warning: killall: rknn_server: no process killed
Please skip it if rknn_server not running on board.
I Starting ntp or adb, target is RK3576
I Start adb...
I Connect to Device success!
I NPUTransfer(3672747): Starting NPU Transfer Client, Transfer version 2.2.2 (12abf2a@2024-09-02T03:22:41)
E RKNNAPI: rknn_init, server connect fail! ret = -9(ERROR_PIPE)!
E init_runtime: The rknn_server on the concected device is abnormal, please start the rknn_server on the device according to:
https://github.com/airockchip/rknn-toolkit2/blob/master/doc/rknn_server_proxy.md
W init_runtime: ===================== WARN(1) =====================
E rknn-toolkit2 version: 2.3.2
E init_runtime: Traceback (most recent call last):
File "rknn/api/rknn_log.py", line 344, in rknn.api.rknn_log.error_catch_decorator.error_catch_wrapper

Note

    I NPUTransfer(3672747): Starting NPU Transfer Client, Transfer version 2.2.2 (12abf2a@2024-09-02T03:22:41)
E RKNNAPI: rknn_init, server connect fail! ret = -9(ERROR_PIPE)!
E init_runtime: The rknn_server on the concected device is abnormal, please start the rknn_server on the device according to:
https://github.com/airockchip/rknn-toolkit2/blob/master/doc/rknn_server_proxy.md

Following the hint, go to https://github.com/airockchip/rknn-toolkit2/blob/master/doc/rknn_server_proxy.md to find the solution

In this document's

6. FAQ

Problem 1

On Debian systems, the rknn_server service has been started in the background, but the following error still occurs during on-board inference:

D NPUTransfer: ERROR: socket read fd = 4, n = -1: Connection reset by peer
D NPUTransfer: Transfer client closed, fd = 4
E RKNNAPI: rknn_init, server connect fail! ret = -9(ERROR_PIPE)!
E build_graph: The rknn_server on the concected device is abnormal, please start the rknn_server on the device according to:
https://github.com/airockchip/rknn-toolkit2/blob/master/doc/rknn_server_proxy.md

Solution: This is usually because the adbd program on the Debian firmware is not listening on port 5037. You can run the following command on the board to check:

netstat -n -t -u -a

If the output does not contain port 5037, run the following commands to download and update the adbd program, and reboot the board; otherwise, skip the following steps.

wget -O adbd.zip https://ftzr.zbox.filez.com/v2/delivery/data/7f0ac30dfa474892841fcb2cd29ad924/adbd.zip
unzip adbd.zip
adb push adbd/linux-aarch64/adbd /usr/bin/adbd

Enter the device shell command to add executable permission to adbd

adb shell "chmod +x /usr/bin/adbd"
adb reboot

After rebooting the device, follow the startup steps to start the rknn_server service and try on-board inference again.

Although this document uses Debian firmware and I use buildroot, the symptom is the same. Follow its solution to troubleshoot:

# This is the board side
root@rk3576-buildroot:/# netstat -n -t -u -a
Active Internet connections (servers and established)
Proto Recv-Q Send-Q Local Address Foreign Address State
tcp 0 0 0.0.0.0:53 0.0.0.0:* LISTEN
tcp 0 0 0.0.0.0:22 0.0.0.0:* LISTEN
tcp 0 0 :::53 :::* LISTEN
tcp 0 0 :::22 :::* LISTEN
tcp 0 0 :::5555 :::* LISTEN
udp 0 0 0.0.0.0:53 0.0.0.0:*
udp 0 0 0.0.0.0:67 0.0.0.0:*
udp 0 0 0.0.0.0:68 0.0.0.0:*
udp 0 0 127.0.0.1:323 0.0.0.0:*
udp 0 0 :::53 :::*
udp 0 0 ::1:323 0.0.0.0:*
udp 0 0 :::546 :::*

As you can see, port 5037 is indeed not open

# This is the PC side
wget -O adbd.zip https://ftzr.zbox.filez.com/v2/delivery/data/7f0ac30dfa474892841fcb2cd29ad924/adbd.zip
unzip adbd.zip
adb push adbd/linux-aarch64/adbd /usr/bin/adbd
adb shell "chmod +x /usr/bin/adbd"
adb reboot

After rebooting the development board, retest

# This is the board side
restart_rknn.sh
root@rk3576-buildroot:/# netstat -n -t -u -a
Active Internet connections (servers and established)
Proto Recv-Q Send-Q Local Address Foreign Address State
tcp 0 0 127.0.0.1:5037 0.0.0.0:* LISTEN
tcp 0 0 0.0.0.0:22 0.0.0.0:* LISTEN
tcp 0 0 0.0.0.0:53 0.0.0.0:* LISTEN
tcp 0 0 0.0.0.0:5555 0.0.0.0:* LISTEN
tcp 0 0 :::22 :::* LISTEN
tcp 0 0 :::53 :::* LISTEN
udp 0 0 0.0.0.0:53 0.0.0.0:*
udp 0 0 0.0.0.0:67 0.0.0.0:*
udp 0 0 0.0.0.0:68 0.0.0.0:*
udp 0 0 127.0.0.1:323 0.0.0.0:*
udp 0 0 :::546 :::*
udp 0 0 :::53 :::*
udp 0 0 ::1:323 0.0.0.0:*

As you can see, port 5037 is now being listened on. Continue trying on-board inference

# This is the PC side
(rknn-toolkit2) ubuntu@ubuntu-2204:~/rknn/rknn_model_zoo/examples/yolov8/python$ python3 yolov8.py --target rk3576 --model_path ../model/yolov8.rknn --img_show
I rknn-toolkit2 version: 2.3.2
--> Init runtime environment
adb: unable to connect for root: closed
I target set by user is: rk3576
I Get hardware info: target_platform = rk3576, os = Linux, aarch = aarch64
I Check RK3576 board npu runtime version
I Starting ntp or adb, target is RK3576
I Start adb...
I Connect to Device success!
I NPUTransfer(3675220): Starting NPU Transfer Client, Transfer version 2.2.2 (12abf2a@2024-09-02T03:22:41)
I NPUTransfer(3675220): TransferBuffer: min aligned size: 1024
D RKNNAPI: ==============================================
D RKNNAPI: RKNN VERSION:
D RKNNAPI: API: 2.3.2 (1842325 build@2025-03-30T09:55:23)

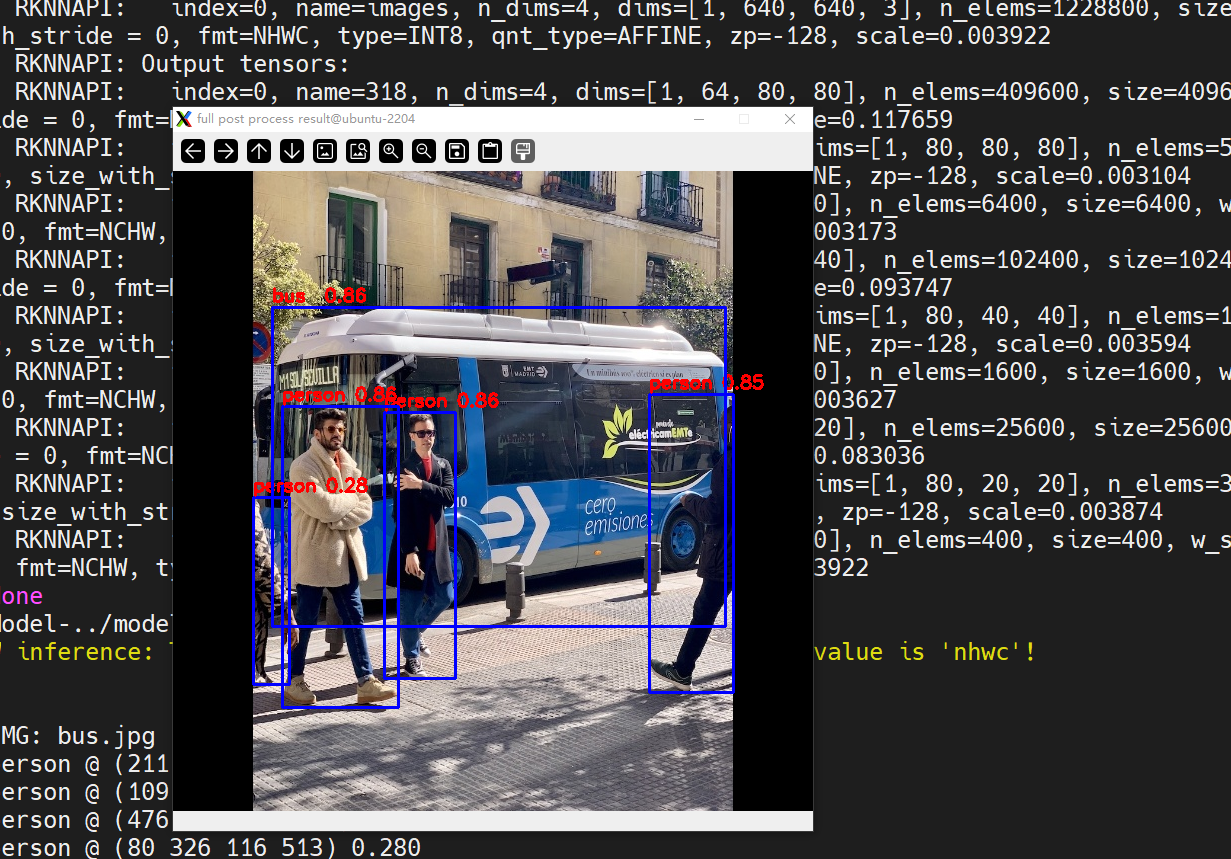
On-board inference succeeded, showing the face recognition image

b70deb69-aaeb-4e8f-a09f-c77091008511

3. On-Board Inference (Native)

Since buildroot is used, and the RK platform after rk1808 does not support python deployment in buildroot, setting up a python inference software stack yourself is time-consuming and encounters many issues. For the python demo, refer to the 100ASK RKNN环境搭建 | 东山Π; it won't be elaborated here. Using the cpp interface, we still use the aforementioned yolov8 for on-board inference:

Prepare the Model

cd ~/rknn/rknn_model_zoo/examples/yolov8/model
sh download_model.sh
ls -lah yolov8n.onnx
-rw-rw-r-- 1 ubuntu ubuntu 13M Nov 29 07:36 yolov8n.onnx

Model Conversion

cd ../python/
(rknn-toolkit2) ubuntu@ubuntu-2204:~/rknn/rknn_model_zoo/examples/yolov8/python$ python convert.py ../model/yolov8n.onnx rk3576 i8 ../model/yolov8n.rknn

python convert.py ../model/yolov5s_relu.onnx rk3576 i8 ../model/yolov5s_relu.rknn

I rknn-toolkit2 version: 2.3.2
--> Config model
done
--> Loading model
I Loading : 100%|██████████████████████████████████████████████| 126/126 [00:00<00:00, 43282.74it/s]
done
--> Building model
I OpFusing 0: 100%|█████████████████████████████████████████████| 100/100 [00:00<00:00, 1590.15it/s]
I OpFusing 1 : 100%|█████████████████████████████████████████████| 100/100 [00:00<00:00, 860.03it/s]
I OpFusing 0 : 100%|█████████████████████████████████████████████| 100/100 [00:00<00:00, 739.11it/s]
I OpFusing 1 : 100%|█████████████████████████████████████████████| 100/100 [00:00<00:00, 652.15it/s]
I OpFusing 2 : 100%|█████████████████████████████████████████████| 100/100 [00:00<00:00, 229.74it/s]
W build: found outlier value, this may affect quantization accuracy
const name abs_mean abs_std outlier value
model.0.conv.weight 2.44 2.47 -17.494
model.22.cv3.2.1.conv.weight 0.09 0.14 -10.215
model.22.cv3.1.1.conv.weight 0.12 0.19 13.361, 13.317
model.22.cv3.0.1.conv.weight 0.18 0.20 -11.216
I GraphPreparing : 100%|████████████████████████████████████████| 161/161 [00:00<00:00, 3291.17it/s]
I Quantizating : 100%|████████████████████████████████████████████| 161/161 [00:04<00:00, 34.87it/s]
W build: The default input dtype of 'images' is changed from 'float32' to 'int8' in rknn model for performance!
Please take care of this change when deploy rknn model with Runtime API!
W build: The default output dtype of '318' is changed from 'float32' to 'int8' in rknn model for performance!
Please take care of this change when deploy rknn model with Runtime API!
W build: The default output dtype of 'onnx::ReduceSum_326' is changed from 'float32' to 'int8' in rknn model for performance!
Please take care of this change when deploy rknn model with Runtime API!
W build: The default output dtype of '331' is changed from 'float32' to 'int8' in rknn model for performance!
Please take care of this change when deploy rknn model with Runtime API!
W build: The default output dtype of '338' is changed from 'float32' to 'int8' in rknn model for performance!
Please take care of this change when deploy rknn model with Runtime API!
W build: The default output dtype of 'onnx::ReduceSum_346' is changed from 'float32' to 'int8' in rknn model for performance!
Please take care of this change when deploy rknn model with Runtime API!
W build: The default output dtype of '350' is changed from 'float32' to 'int8' in rknn model for performance!
Please take care of this change when deploy rknn model with Runtime API!
W build: The default output dtype of '357' is changed from 'float32' to 'int8' in rknn model for performance!
Please take care of this change when deploy rknn model with Runtime API!
W build: The default output dtype of 'onnx::ReduceSum_365' is changed from 'float32' to 'int8' in rknn model for performance!
Please take care of this change when deploy rknn model with Runtime API!
W build: The default output dtype of '369' is changed from 'float32' to 'int8' in rknn model for performance!
Please take care of this change when deploy rknn model with Runtime API!
I rknn building ...
I rknn building done.
done
--> Export rknn model
done
cd ../model
ls -lah yolov8n.rknn
-rw-rw-r-- 1 ubuntu ubuntu 6.2M Nov 29 07:39 yolov8n.rknn

Run the RKNN C Example

First, compile the C example, then deploy the executable file, model file, and resource files to the board.

Compilation

For compilation, use the build-linux.sh script in the rknn_model_zoo directory; you need to configure the toolchain first. Modify build-linux.sh:

GCC_COMPILER=/home/ubuntu/rk3576/prebuilts/gcc/linux-x86/aarch64/gcc-arm-10.3-2021.07-x86_64-aarch64-none-linux-gnu/bin/aarch64-none-linux-gnu
chmod +x ./build-linux.sh
./build-linux.sh -t rk3576 -a aarch64 -d yolov8
-- Set runtime path of "/home/ubuntu/rknn/rknn_model_zoo/install/rk3576_linux_aarch64/rknn_yolov8_demo/./rknn_yolov8_demo" to "$ORIGIN/../lib"
-- Installing: /home/ubuntu/rknn/rknn_model_zoo/install/rk3576_linux_aarch64/rknn_yolov8_demo/model/bus.jpg
-- Installing: /home/ubuntu/rknn/rknn_model_zoo/install/rk3576_linux_aarch64/rknn_yolov8_demo/model/coco_80_labels_list.txt
-- Installing: /home/ubuntu/rknn/rknn_model_zoo/install/rk3576_linux_aarch64/rknn_yolov8_demo/model/yolov8.rknn
-- Installing: /home/ubuntu/rknn/rknn_model_zoo/install/rk3576_linux_aarch64/rknn_yolov8_demo/model/yolov8n.rknn
-- Installing: /home/ubuntu/rknn/rknn_model_zoo/install/rk3576_linux_aarch64/rknn_yolov8_demo/lib/librknnrt.so
-- Installing: /home/ubuntu/rknn/rknn_model_zoo/install/rk3576_linux_aarch64/rknn_yolov8_demo/lib/librga.so
# Take a look
ubuntu@ubuntu-2204:~/rknn/rknn_model_zoo/install$ tree -L 4
.
└── rk3576_linux_aarch64
└── rknn_yolov8_demo
├── lib
│ ├── librga.so
│ └── librknnrt.so
├── model
│ ├── bus.jpg
│ ├── coco_80_labels_list.txt
│ ├── yolov8n.rknn
│ └── yolov8.rknn
├── rknn_yolov8_demo
└── rknn_yolov8_demo_zero_copy

This rknn_yolov8_demo is the set of files to be deployed to the board

adb push install/rk3576_linux_aarch64/rknn_yolov8_demo /data/
install/rk3576_linux_aarch64/rknn_yolov8_demo/: 8 files pushed. 3.6 MB/s (23008641 bytes in 6.049s)

Run on the board side

root@rk3576-buildroot:/data/rknn_yolov8_demo# ./rknn_yolov8_demo ./model/yolov8.rknn ./model/bus.jpg
load lable ./model/coco_80_labels_list.txt
model input num: 1, output num: 9
input tensors:
index=0, name=images, n_dims=4, dims=[1, 640, 640, 3], n_elems=1228800, size=1228800, fmt=NHWC, type=INT8, qnt_type=AFFINE, zp=-128, scale=0.003922
output tensors:
index=0, name=318, n_dims=4, dims=[1, 64, 80, 80], n_elems=409600, size=409600, fmt=NCHW, type=INT8, qnt_type=AFFINE, zp=-58, scale=0.117659
index=1, name=onnx::ReduceSum_326, n_dims=4, dims=[1, 80, 80, 80], n_elems=512000, size=512000, fmt=NCHW, type=INT8, qnt_type=AFFINE, zp=-128, scale=0.003104
index=2, name=331, n_dims=4, dims=[1, 1, 80, 80], n_elems=6400, size=6400, fmt=NCHW, type=INT8, qnt_type=AFFINE, zp=-128, scale=0.003173
index=3, name=338, n_dims=4, dims=[1, 64, 40, 40], n_elems=102400, size=102400, fmt=NCHW, type=INT8, qnt_type=AFFINE, zp=-45, scale=0.093747
index=4, name=onnx::ReduceSum_346, n_dims=4, dims=[1, 80, 40, 40], n_elems=128000, size=128000, fmt=NCHW, type=INT8, qnt_type=AFFINE, zp=-128, scale=0.003594
index=5, name=350, n_dims=4, dims=[1, 1, 40, 40], n_elems=1600, size=1600, fmt=NCHW, type=INT8, qnt_type=AFFINE, zp=-128, scale=0.003627
index=6, name=357, n_dims=4, dims=[1, 64, 20, 20], n_elems=25600, size=25600, fmt=NCHW, type=INT8, qnt_type=AFFINE, zp=-34, scale=0.083036
index=7, name=onnx::ReduceSum_365, n_dims=4, dims=[1, 80, 20, 20], n_elems=32000, size=32000, fmt=NCHW, type=INT8, qnt_type=AFFINE, zp=-128, scale=0.003874
index=8, name=369, n_dims=4, dims=[1, 1, 20, 20], n_elems=400, size=400, fmt=NCHW, type=INT8, qnt_type=AFFINE, zp=-128, scale=0.003922
model is NHWC input fmt
model input height=640, width=640, channel=3
origin size=640x640 crop size=640x640
input image: 640 x 640, subsampling: 4:2:0, colorspace: YCbCr, orientation: 1
scale=1.000000 dst_box=(0 0 639 639) allow_slight_change=1 _left_offset=0 _top_offset=0 padding_w=0 padding_h=0
rga_api version 1.10.1_[0]
rknn_run
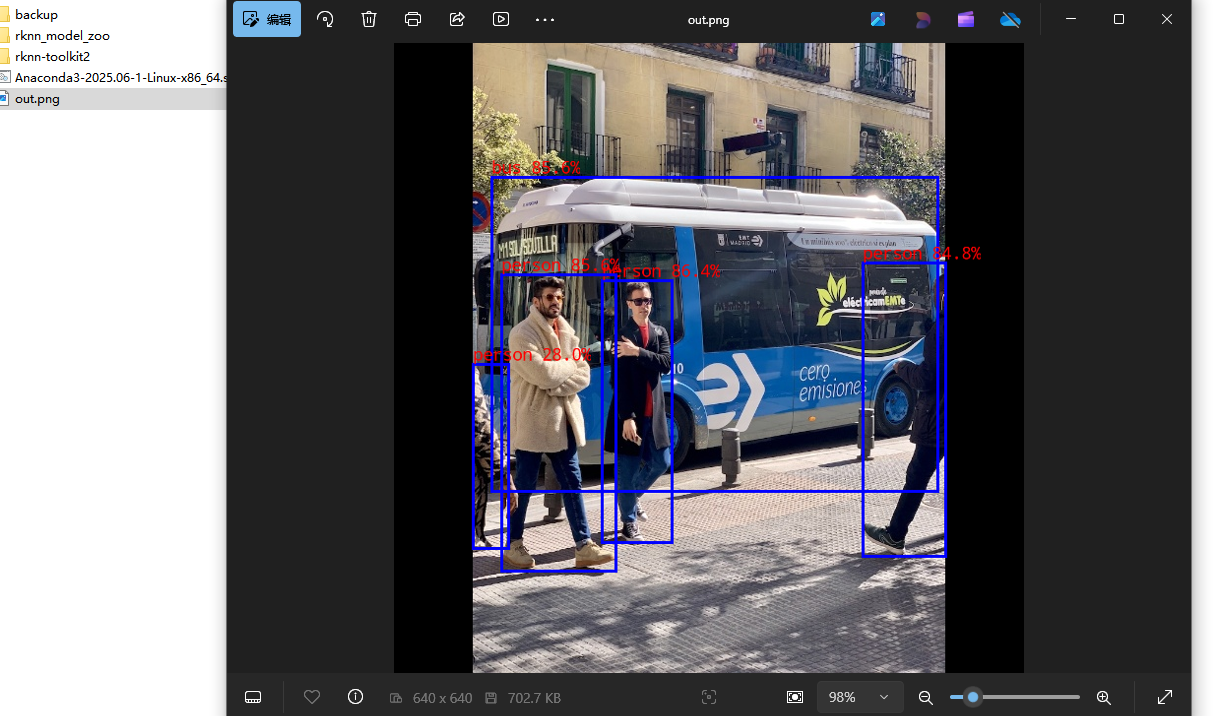
person @ (211 241 282 507) 0.864
person @ (109 235 225 536) 0.856
bus @ (99 136 552 455) 0.856
person @ (476 223 560 521) 0.848
person @ (80 326 116 513) 0.280
write_image path: out.png width=640 height=640 channel=3 data=0x3e2e9200

View on the PC side

adb pull /data/rknn_yolov8_demo/out.png ./

image-20251129221548372

Matches expectations

At this point, the RKNN environment has been set up successfully